Build a LED vacuum exposure unit for a fraction of the cost of buying one new. Screen printers DIY
Автор: Garage Ink
Загружено: 2021-07-20
Просмотров: 35309
In this video I take you thru my screen printing LED vacuum blanket exposure build that literally saved me thousands of dollars. Knowing I needed to take my screen printing up a level, capturing detailed halftones and photo realistic graphics, I knew I needed a legit exposure unit. But sticker shock set in when I searched online and saw what these glorified light boxes sold for over $2,000.00!
It’s a fancy box with some switches and and lights! Throw in a vacuum pump, how hard could it be? We’ll, it’s not. Anyone can do it, and this is how I built mine. Save your cash and follow this store quality DIY build.
Visit our site & check out our apparel line: https://psapparel.com/
Facebook: / prodigalseankearney
Instagram: / prodigalsonapparel
PARTS LIST
1- Used Metal Office Cabinet 3’ x 3 ½’ (36” x 42”), with 3 shelves.
142”- Aluminum Angle 1” (to hold glass) : https://www.homedepot.com/p/Everbilt-...
156” Steel Tube 1” Square (Vacuum Blanket Lid/Frame) Is Available at Home Depot but much cheaper from local steel supply
150” Steel angle 1” (Vacuum Blanket Lid/Frame) Is Available at Home Depot but much cheaper from local steel supply
6 - Carriage Bolts or Standard Hex Bolts , ½” x 2 ½” with nuts and washers
1- 3/8” tempered glass (free of defects) cut to fit from your local glass/window supplier. Shop around for best price
1- Vacuum Exposure Unit Blanket – Cut To Fit - https://www.ebay.com/itm/233176028969...
40’ x ½” wide x 1/8” thick, Foam Weather Strip with Adhesive; https://www.amazon.com/Adhesive-2-Neo...
Adjustable latches: https://www.amazon.com/Tegg-Cabinet-H...
3 – Round Rocker Switch or Toggle Switch 120 volt : https://www.amazon.com/Generic-Light-...
1- Omron Timer H5CX (Really any 120volt timer works that can be set to switch in multiple seconds) : https://www.ebay.com/itm/174144411874...
1- 6 Circuit Terminal Block: https://www.homedepot.com/p/Gardner-B...
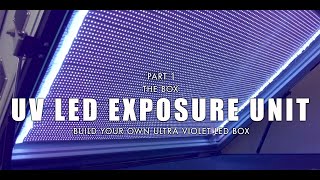
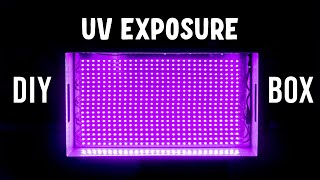
NOTE!!! I went overkill with my lights listed below. My screens burn in 16 seconds!!! I selected HIGH DENSITY LEDs and also spaced my lights about 2.5” apart. In hindsight I could of saved some $ and got regular instead of high density. If you wanna burn in 16 sec then by all means get High Density. If deciding on regular density take the time to read item description. You might be able to use one driver instead of two, depending on overall length and wattage. Take the time, do the calculations.
2 – 16.4’ LED Strips MUST SELECT LENGTH & ULTRA VIOLET WHEN ADDING TO CART: https://www.ledsupply.com/led-strips/...
1 – 6’ LED Strip MUST SELECT LENGTH & ULTRA VIOLET WHEN ADDING TO CART: https://www.ledsupply.com/led-strips/...
2- LED Drivers part # LPV-X-X / LPV-60-12 -MUST SELECT 60 WATT 12VOLT OUTPUT WHEN ADDING TO CART : https://www.ledsupply.com/power-suppl...
1 - ZENY 3.5 CFM Vacuum Pump: https://www.amazon.com/ZENY-Single-St...
1 - 3/8” Swivel Whip Air Hose: https://www.harborfreight.com/3-8-eig...
Various hose fittings, nipples, hose clamps, and adaptors are needed to get from your vacuum pump swivel hose to the vacuum blanket frame/lid. Just take your swivel hose (or any heavy duty hose of your choosing that fits the vacuum pump) to the nearest supply store and come up with your unique adapters.
WIRING INFO: WIRING IS GOING TO BE DIFFERENT DEPENDING ON WHAT TYPE OF LENGTH YOU DECIDE TO GO WITH ON YOUR LED STRIPS, HOW MANY DRIVERS ARE NEEDED, TYPE OF TIMER ETC.
FOR SUBSCRIBERS THAT HAVE THE NOTIFICATION BELL TURNED ON: I WILL PERSONALLY RESPOND VIA EMAIL WITH MY SPECIFIC WIRING DIAGRAM I USED IN MY BUILD. JUST REQUEST IN THE COMMENTS AND TURN ON THAT NOTIFICATION BELL. I WILL ALSO DO MY BEST TO ADDRESS ANY ALTERCATIONS OR CHANGES IN ELECTRICAL YOU DECIDE TO DO.

Доступные форматы для скачивания:
Скачать видео mp4
-
Информация по загрузке: