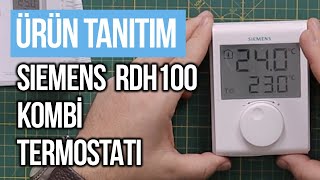
SIEMENS RDH100 digitális szobatermosztát bekötése
Автор: PÖRÖLY
Загружено: 2024-08-21
Просмотров: 5818
PÖRÖLY channel: / @vadernajozsef
All videos:
/ @vadernajozsef
Connection of SIEMENS RDH100 digital room thermostat.
I am replacing an old MMG AM type thermostat with this digital thermostat.
It can be confusing why the old thermostat has three connections and the digital one only has two.
The dismantled old MMG thermostat has three wires because it also gets zero, which it needs for two reasons:
One is so the light on it can light up when you turn on the heat.
The other is that it has a heating element that can be turned on with the night switch. This slightly heats the thermostat inside, which makes it think it's about 4 degrees warmer. Therefore, it maintains a temperature lower than the set one at night, and there is no need to turn the knob down.
On the other hand, a digital thermostat is powered by the battery, which is why it does not need mains voltage, but only switches the supplied phase on and off and sends it to the boiler.
This siemens thermostat is very simple, there is no programming option, no night setting, you can only scroll. It is powered by 2 AA type pencil batteries. The digital display shows the current room temperature at the top and the set temperature at the bottom. The base plate of the thermostat is attached to the wall, the wires must be connected to it, and the thermostat itself can be placed separately on the base plate and removed if necessary. There is no phase protection on the thermostat, it is not necessary and cannot be connected. The supply line of the phase must have a circuit breaker. So the connection is as follows: the phase, in this case a brown wire, goes to the LX terminal, and when the thermostat is switched on, the current comes out at the L1 terminal, which is brought back to the boiler by another, in this case green-yellow wire.
The thermostat has a menu in which basic settings can be made. To do this, press and hold the rear RESET button for 5 seconds until "P01" appears. By pressing the RESET button again, the value of the parameter in the second line flashes and is ready for setting. Set the desired parameter using the rotary knob. There are values 0,1,2 and 4, set it to 1. Press the RESET button once to confirm the setting. Turn the adjustment knob clockwise to the next parameter, which is the p2 indication, with this we can set the maximum temperature range of the thermostat, which is max. It can be 30 degrees. In the p3 menu, you can set the minimum temperature range of the thermostat, i.e. a minimum of 5 degrees. You can exit the parameter setting by setting the setting button to "End" or by pressing the rest button.

Доступные форматы для скачивания:
Скачать видео mp4
-
Информация по загрузке: