Painting Faux Shiplap | Melissa Peterson Designs
Автор: BeeKindHarvest
Загружено: 2020-05-11
Просмотров: 1355
Painting Faux Shiplap turned out to be such an easy home decor project! I am so thrilled I jumped in and gave it a try! Let me know what you think.
Supplies I Used
Paint color of your choice: I used Sherwin Williams Naval
Paint Brush
Frog tape https://amzn.to/34JQv3y
Ruler https://amzn.to/3KFcqrY
THE LINKS ABOVE MAY CONTAINS AMAZON, HOBBY LOBBY AND WALMART AFFILIATE LINKS. THIS MEANS IF YOU MAKE A PURCHASE, I MAY RECEIVE A SMALL COMMISSION, AT NO COST TO YOU.
Gathering my supplies for Faux Shiplap
Painting faux shiplap has got to be on of the easiest projects I have done yet!
And this project takes very few supplies!
Paint, paint brush, ruler, and frog tape.
That’s it!
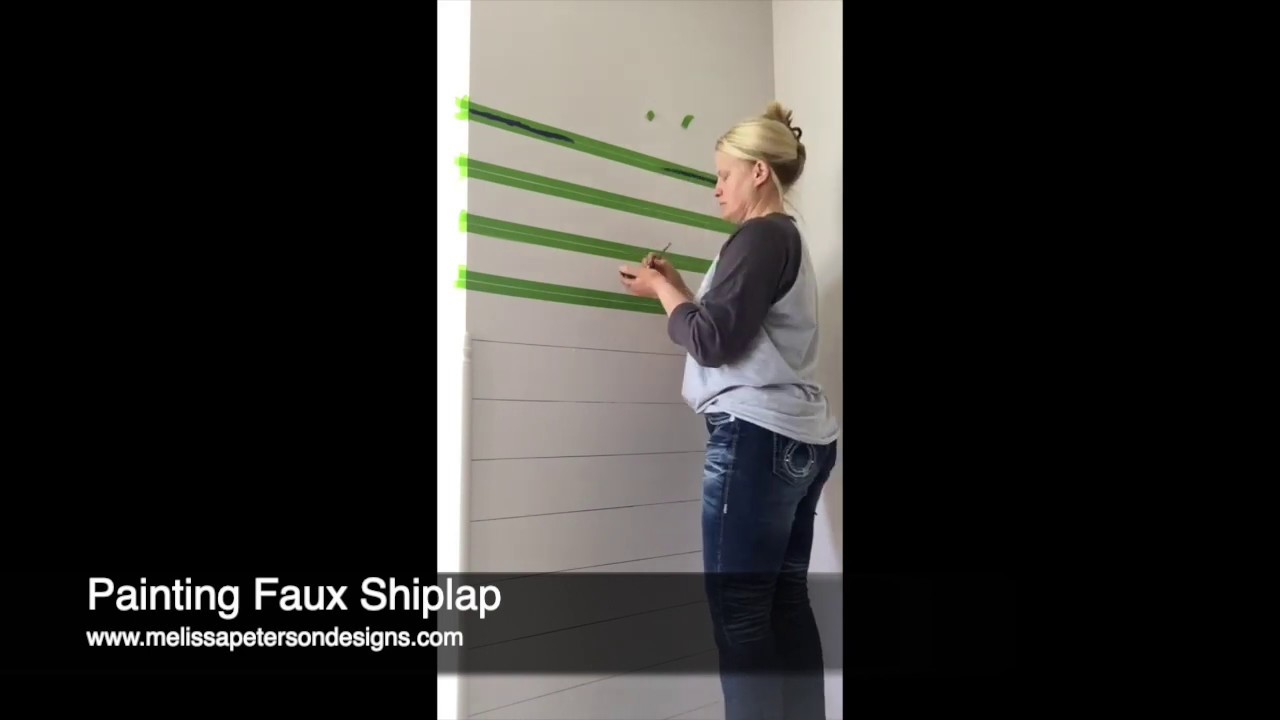
TIME TO PAINT SOME FAUX SHIPLAP
Since my floors are a little uneven, or not level, I decide to start painting my stripes from the bottom up.
I also decided I wanted my faux shiplap to be 6″ apart.
I tore off two small strips of frog tape, put my ruler up on the top of my baseboard and used my strips of tape to mark 6″.
Since I’m working on a narrow wall, I placed these small strips towards the ends of each side of my wall.
Next I pulled off enough frog tape to mark across the wall just above my two small strips of tape.
I then removed the two small strips of tape and I’ll reuse these I as I work my way up the wall.
Burnish the long strip of tape with your fingers.
Now, pull off another long strip of frog tape.
I then line this tape up below the other strip, leaving a narrow open space and slowly apply this along the wall.
Make sure to burnish this tape also by rubbing your fingers over this.
Another trick I like to do, is apply two small strips of tape on each side.
This way my faux shiplap will go just up to the corner of the wall on each side.
The reason I do this, I want to minimize the chance of having a any bleeds in the corners of the walls.
Now grab your paint brush and your paint and start painting your pinstripes or faux shiplap.
Once this line is dry, place your ruler over that line and measure 6″ above this and start the process all over again!
To see how I did this, check out my YouTube video below!
Facebook TutorialIThenTheThat
Доступные форматы для скачивания:
Скачать видео mp4
-
Информация по загрузке:


