60) Olive Bonsai Repotting: PART 2: Pruning roots
Автор: Mă-Kè Bonsai
Загружено: 2015-10-14
Просмотров: 6934
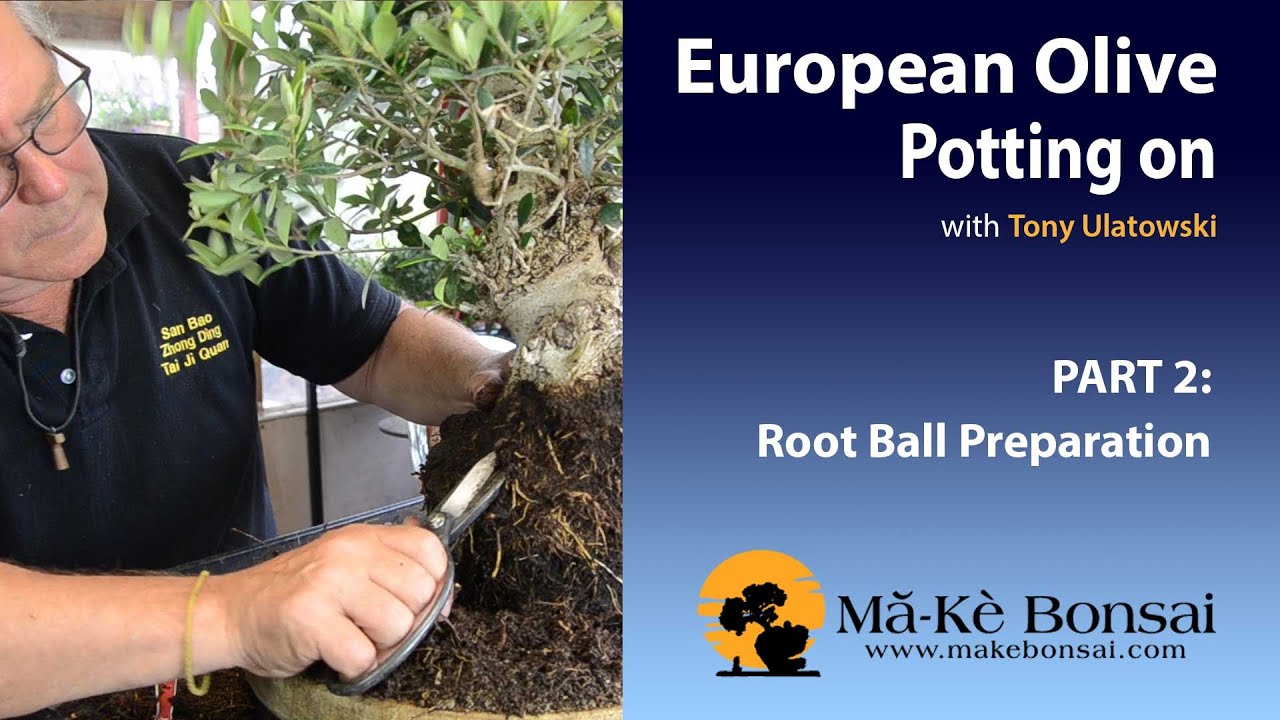
Part 2: Of this videos show you how to prepare the root ball, of this field grown olive, for potting on. The root ball has to be substantially reduced and we show you how to safely do so.
Here’s the exciting bit.
I enjoyed doing that process. It sort of sets me up mentally to do the next approach that we’re going to go through. So this is a filled grown olive tree which basically means it’s been in a field for about18 years and it’s been growing and it’s been cut, been growing and cut, and this is why we have this lovely looking sort of trunk and the exciting thing for me is when we get it out of the pot and start working with it to see how it all unravels.
So now we’ve got the process of taking it out of the pot. What I’m using here is my mallet, just gently tap to loosen it off. Right. Beautiful. Did you notice how easy that was, just to come out of the pot there. So with the nebari, just work it, cleaning off to expose. Again, beginning too like the look of this. What I’ve also learned is just to sort of, to have this really nice, taper down to the spread. So systematically I just want to use the toothbrush to have a look at that as we go. Just work round it a little bit more. Just expose it.
I like to attempt with the metal chopstick here so that I’m not digging in, digging in to the root and sort of taking the time to expose, and it’s just having that confidence that you just systematically work, scraping, releasing and exposing and so therefore you’re making decisions as you’re working, so sometimes every stroke is quite relative. You’re looking and observing as you’re developing. It’s quite solid through here.
You see if I dig in that way, we just ripping it off so I need to just expose
I don’t know what, just for me, it’s almost like a cliff face. This side is sheerer here and then coming down and over it. It’s quite pleasant to explore.
Whether I will leave that totally exposed, I’m not sure yet but that’s the beautiful thing about bonsai if you’re going to be repotting, and repositioning, exposing so ...
Later on, this area here, we can do some dead wood treatment and a bit more of the other aspects of bonsai training, the creative bit of changing it in different ways, working that which is something I'm looking forward to learning and progressing to in that journey.
Olive trees in the wild have lots of dead wood.
Lots.
Lots and lots.
So we can get that. Now I need to take the sides off a little bit more and I need to expose a bit to trim up and make this root ball a little bit tighter.
So, now, for me the important, again, every process is important, wiring up the pot etc. Now we’ve decided approximately where the level is going to be in the pot, it’s important to measure the depth of the pot, so therefore we know what we’re going to take off.
So we don’t expose or take way too much of the root ball but just take away what is necessary for the pot. We’ll work in, so you just need to start to loosen off. I’ve got my line so I know where I’m going to be working into, just want to loosen off first of all so I can see, and this really didn’t.
So there we have it, and we’re going to just check, a nice 360. There we go. What we’re going to do now. I’m just going to have a look in the pot and then I’m going to clean all this up so we can get on with the next stage.
Right. There we go.
So if I put it back on there.
So you can see, what I’m quite pleased about is that when we put in the soil, it’s just about positioning and getting the position right because we’ve done all the other work. The preparation is the key and you can see where I’m working on that line where the soil.... You can see where the soil is going to sit in here and slightly bevel down into the pot.
I’m very pleased with that and what I want to do is get tidied up ready for the next section
Доступные форматы для скачивания:
Скачать видео mp4
-
Информация по загрузке: