How to make a photo button
Автор: Wethington Photo
Загружено: 2023-01-14
Просмотров: 11906
How to make a photo button
Here is what I was using:
Button Press https://amzn.to/3U6AR9y
Canon Pro Luster Pape. https://amzn.to/3U9U6PA
Affiliate links above. If you use the links I do get a small commission. Thank you
Print out your photo using one of my templates or a square picture.
To print the photo use a 3.25 x 3.25 inch photo. If you use Lightroom just adjust your cells in the print panel. I use a 3.25 x 3.25 cell. This gets it really close.
If you want to adjust the crop to have it better fit the small ration use the crop tool first. Keyboard shortcut is R.
Custom ratio 3.25 x 3.25 adjust the crop to your liking.
If you use one of my button templates available in the link below. Please follow the instructions from that video first.
You can either print straight from photoshop. Or import it into Lightroom to print more photos than just the single button.
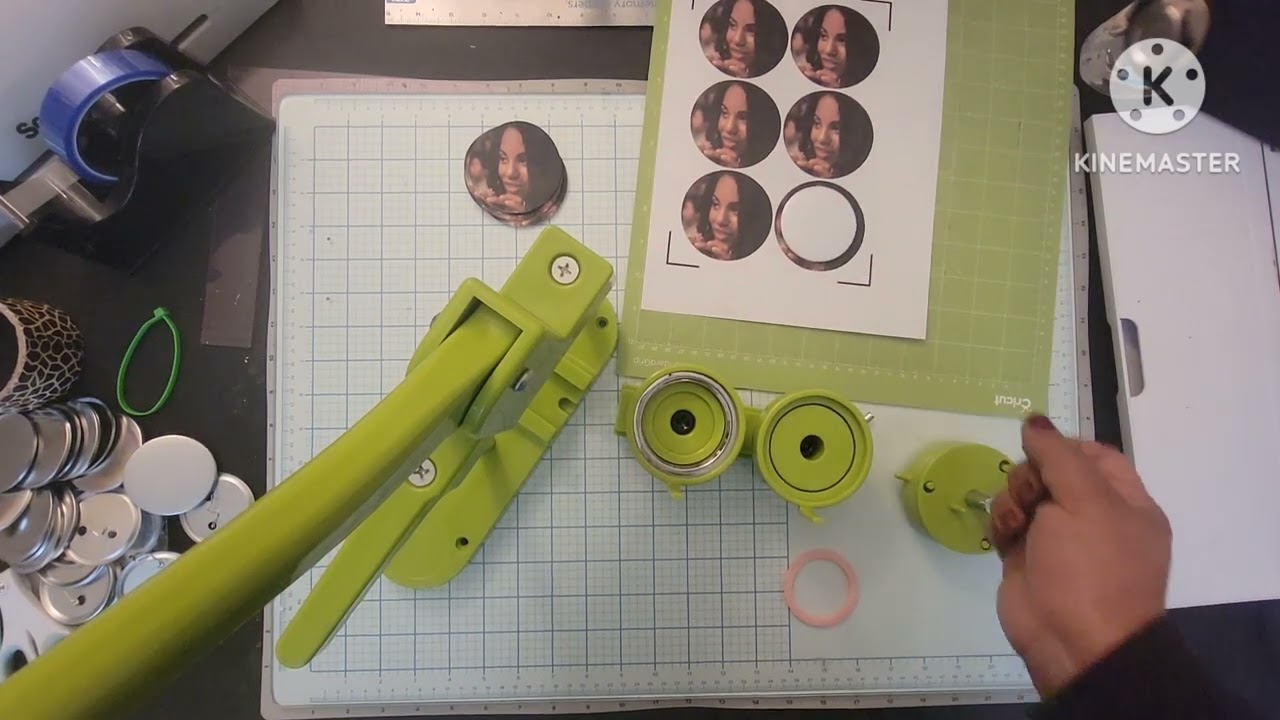
Take top of button to trace circle
Once the button has been printed take the top part of the button. Place it on your photo where you want the photo to be cut.
Then firmly hold the top part of the button on the paper. Trace it with your exacto knife.
I make a few light scratches before I start pressing firmly to make the actual cut. This provides a slight groove for the blade to trace.
Once the groove has been etched into the photo. You can start making the cut. It’ll be a lot easier with the groove.
Cut the button out.
Remove any frays that might be on the button print out. These will almost always get pressed into the button and look terrible.
Put the top of the button in the place holder
Take the top part of the button. The half without the pin. Just the flat surface. Drop it in your button press.
I use this button making press bit.ly/3WgBHxU
I put a little piece of two sided tape
With the top of the button in the press take a small piece of double sided tape. Place it in the middle of the button.
Place the photo as close as you can to the center of the button. Making sure the tape holds the photo in place.
I’ve found this to be able to eliminate a bunch of mistakes with the press.
Just make sure the photo itself isn't sticking too far over the edges. If it is, you have to recenter it. Or cut a smaller circle.
Put the plastic cover over top of it.
The next thing we do is put the plastic cover over the photo.
This should cover the entire surface area of the cavity for the button press.
Move the top of the button under the press.
The first half of your button is ready to go.
Slide it under the press. Line it up as well as possible.
More often than not when I have issues with the button not pressing right it is because the layers aren't lined up right.
Place back of button pin side down
Take the back half of the button. And place it in the other side
Be sure to put the button pin side down.
And line it up as horizontally as possible.
Press the press firmly, but not crazily
Prep the top of the button by pressing the handle down.
THer’s no need to press crazy here. You’re just getting it loaded.
Slide the backing under the press.
WIth the top part of your button loaded.
Slide the back part of the button under the press.
Once again you want to make sure these are lined up properly. As much as possible
Now you can give it a good firm press.
Give a good press. Hold for a second. Not sure if the delay helps or not. But it makes me feel better and more confident in clamping together.
Slide the backing out
Your button is almost done!
Slide the back placeholder out.
Your button is now ready!
Pull the button out.
Your photo button is now ready to wear!
If you did it right you’ll be able to pull on the two different sides without it falling apart.
To test if the button is done right I just try to separate it real quick
I just give it a slight tug.
Sometimes it comes apart like an oreo, and you have to start again.
If this happens try to be as careful as you can to save the photo. Or you can just reprint it and start again.
Photo button is done, enjoy!

Доступные форматы для скачивания:
Скачать видео mp4
-
Информация по загрузке:


![[4K FULL HD] Relaxing Water Background | 1 HOUR | Calm Water Wallpaper (No Sound)](https://imager.clipsaver.ru/y9PTNTSpGJs/max.jpg)