etrailer | Installing the Curt Front Mount Trailer Hitch Receiver on a 2015 Jeep Wrangler
Автор: etrailer
Загружено: 2026-01-20
Просмотров: 5
Click for more info and reviews of this CURT Front Receiver Hitch:
https://www.etrailer.com/Front-Receiv...
Check out some similar Front Receiver Hitch options:
https://www.etrailer.com/fitguidefmr.htm
Search for other popular Jeep Wrangler parts and accessories:
https://www.etrailer.com/vehicle/2015...
https://www.etrailer.com
Don’t forget to subscribe!
/ etrailertv
Full transcript: https://www.etrailer.com/tv-install-c...
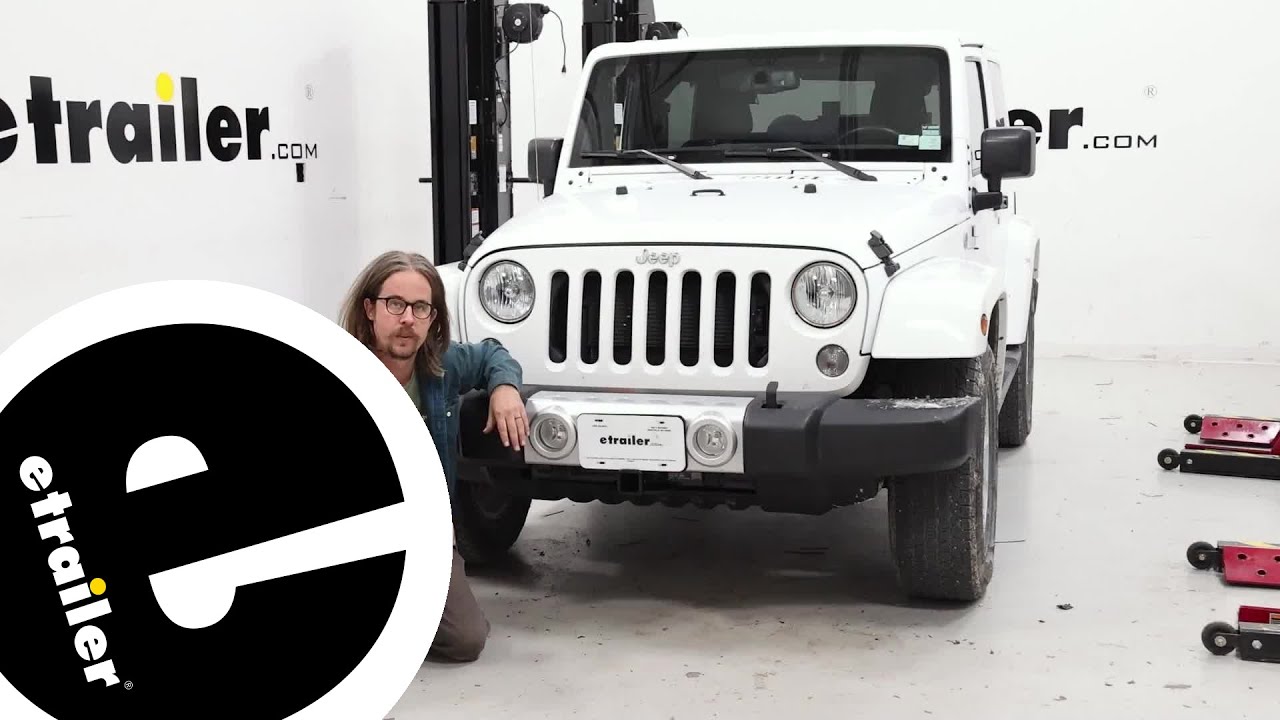
Hi, everyone, Jesse here with etrailer. Today we'll be taking a look at and I'll show you how to install the CURT Custom Fit Front Hitch on our 2015 Jeep Wrangler. Adding a front hitch to your vehicle is a great way to get some extra storage space out of your car, whether it be something like a bike rack, or a spare tire carrier, or you can even throw a snowplow on here to clear out your driveway. Here's a closer look at our hitch installed on our neighbor's Jeep. As you can see, it's just tucked right below the bumper, and we have a two inch by two inch receiver opening. That's gonna be standard for most of your accessories.
Also, behind that is another standard 5/8-inch pin hole. The pin and clip are not included with the hitch. However, we have many options available here at etrailer. Also, any accessory that you add on will most likely come with one included. As I said, it is right below the bumper here, so it's really not gonna cut too much into your ground clearance.
We'll measure from the ground to the top of the inside of the collar here, and it's right at 18 3/4 inches. Then, from the center of our pinhole to the edge of our bumper here is just about two inches, so keep that in mind for any folding accessories that you might add on to ensure they don't make contact with the vehicle. As for our weight capacities with this hitch, we have a gross trailer weight of 3,500 pounds and we have a maximum tongue weight of 350 pounds. That's gonna be the amount of weight pushing down on the hitch. We also have a line pole weight rating.
In case you we inchesre to add a winch on here, that's gonna be a 9,000-pound rating. Always be sure to double-check your winches and also your owner's manual to ensure that you are using this hitch safely. If you have any questions or concerns about this hitch or anything else we offer here at etrailer, feel free to reach out to us. We'd be happy to get you pointed in the right direction. And as for the installation with this hitch, it's honestly not that big of a deal.
However, there is one bolt on the driver's side that took me quite a bit of time, but hopefully I'll show you some tips and tricks to get that done. If you're not looking to do this yourself, then check out our Dealer Locator. You can find someone local to you. They will be happy to get you set up. If you are looking to see how this gets installed, then follow along and I'll walk you through it. We'll begin our installation by removing our lower skid plate here. So, it helps to have a trim panel tool like this or just a flathead screwdriver. Just dig in under that centerpiece and pop the entire thing off. And we'll just work our way from one side to the other and you can get all those removed. (push pin clicking) And then on the inside of our crossmember here, we'll have two more. It's kinda holding up that back side of the skid plate. One there and one over here. (skid plate clattering) Get those popped off. (skid plate clattering) We can set our skid plate aside. Before we lift our hitch into place, we'll want to check out our driver's side lower hole here. So see, there's kind of this bracket that's overlapping that hole and we can't get our bolt to feed through there. So I'm just gonna take a burr bit and widen that out a bit. (drill whirring) And I'll just grind it out and then keep checking to make sure my bolt fits. (drill whirring) And once that bolt will slide through there, we're ready to lift our hitch into place. Now we can lift our hitch into position. You're gonna have to rotate it to get it to slide into place. (hitch clanging) And if you looked at the hitch before, there's two tabs coming off the back side of it. And once you have it lined up, we'll send a bolt through one of the tabs on front of our hitch, and take a spacer block, slide that over that, and top that off with a nut. (bolt clattering) We'll get that hand-tightened on both of those tabs sticking up the front. (metal clanging) Now that we have our bottom hardware just loosely installed, it's gonna hold our hitch in place while we get our side hardware on. So we'll start with the bottom one on the side. We'll have do we feed our fish wire through our frame here and out that bottom hole. So, we'll feed that through and then we can slide our spacer block on, tuc
Доступные форматы для скачивания:
Скачать видео mp4
-
Информация по загрузке: