Beginner-Friendly 100% Whole Wheat Sourdough You'll Ever Bake (Seriously, No Kneading!)
Автор: Proof Point
Загружено: 2026-01-17
Просмотров: 42
Welcome to the easiest sourdough journey you'll ever take! In this video, I'll show you how to make a delicious, crusty, and healthy 100% whole wheat sourdough bread with absolutely no kneading, no complicated folds, and no stand mixer!
This beginner-friendly, rustic loaf is perfect for sandwiches, toast, or dipping into your favorite soup, and it stays soft for days. If you've been intimidated by sourdough, this is the perfect starting point. The process is simple: mix the dough the night before and bake it the next day!
🔔 Subscribe for more easy recipes: / @proof-pnt
Ingredients
1) 120g active sourdough starter
2) 360g water
3) 4 cups (500g) 100% whole wheat flour
4) 2 teaspoons (12g) fine sea salt
5) (Optional: 1/2 tablespoon (7g) olive oil)
Instructions:
Day 1: Mix & Rest
1) Activate Starter: Ensure your sourdough starter has been recently fed and is active/bubbly before you begin.
2) Combine Ingredients: In a large bowl, whisk the active starter into 360g of water until roughly dissolved.
3) Add Flour and Salt: Add the flour and salt to the wet mixture. Use your hands or a dough whisk to mix everything until a shaggy, rough dough forms and no dry bits of flour remain. Avoid vigorous kneading; gentle mixing is enough.
4) Autolyse/Rest: Cover the bowl with a damp towel or plastic wrap and let it rest for 30 minutes to 1 hour.
5) Bulk Fermentation (with gentle folds): Over the next 3-4 hours, perform a few sets of "stretch and folds" every 30-60 minutes to build strength. (as demonstrated in the video – wet hands, pull the dough up, and fold it over itself a few times in the bowl).
6) Cold Proof: After the last stretch and folds, cover and place in the refrigerator for 12-15 hours (overnight).
Day 2: Bake
1) Shape: The next morning, gently scrape the dough onto a lightly floured surface. Preshape it into a ball, let it rest for 15-20 minutes, then perform a final shape. Place the shaped dough seam-side up in a floured proofing basket (banneton) or a bowl lined with a floured tea towel. Cover and place in the refrigerator for 3-4 hours.
2) Preheat Oven: Place the empty skillet into the oven for steam while the oven preheats to 500°F (260°C) with a pizza stone or tray on the middle rack.
3) Prep Dough & Score: Remove the dough from the fridge. Invert the dough onto a piece of parchment paper. Lightly dust the top with flour and score a design using a sharp knife or bread lame.
4) Bake: Carefully transfer the loaf (using a pizza peel or parchment paper) onto the preheated pizza stone. Lower temperature to 450°F (232°C)
5) The Bake Cycle:
Bake for 20-30 minutes at 450°F (after an initial high heat burst if you prefer). The steam will help the bread rise.
Remove the steam pan/water tray (be very careful, it's hot!).
Bake for an additional 20-30 minutes or until the crust is golden brown and sounds hollow when tapped on the bottom.
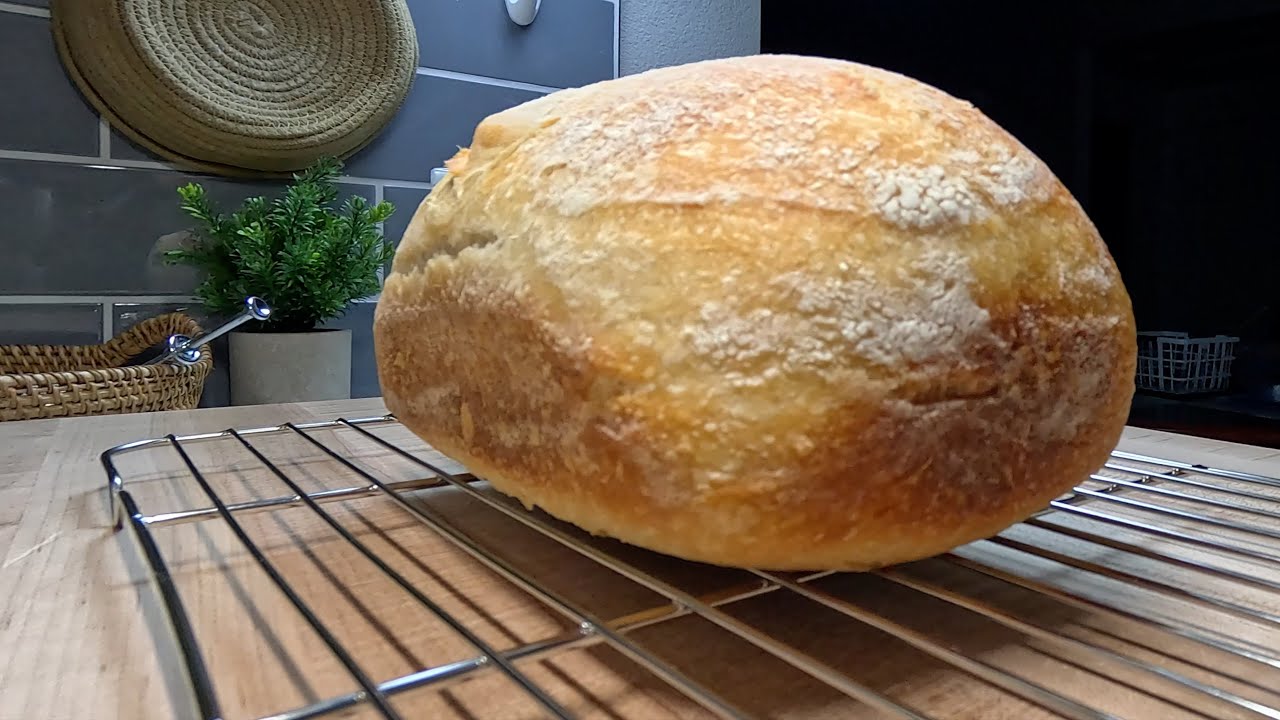
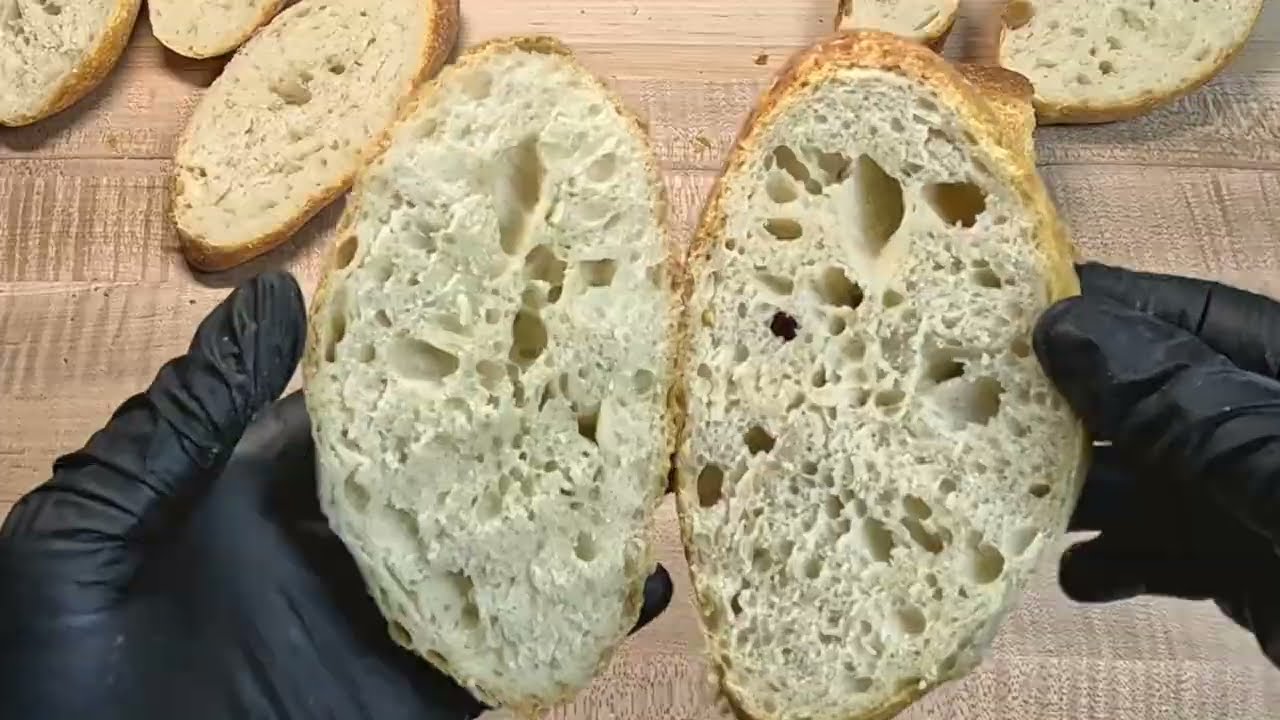
6) Cool: Transfer the finished loaf to a wire rack and let it cool completely for at least 1-2 hours before slicing. This is crucial for the internal structure and to ensure the best texture.
Hashtags:
#sourdoughbread #nokneadsourdough #wholewheatsourdough #sourdoughforbeginners #easybreadrecipe #healthybread #homemadesourdough #breadtok #sourdoughrecipe #sourdough #wildyeast
Timestamps / Video Chapters:
0:00 - Introduction & The Amazing Result
0:14 - Activating sourdough starter
0:31 - Simple Ingredients & Mixing the Dough
3:20 - First Rise & The "Fold" Technique (instead of kneading!)
6:04 - Preshaping into a ball
8:05 - Shaping into a proofing basket (banneton)
Доступные форматы для скачивания:
Скачать видео mp4
-
Информация по загрузке: