How to Create a Custom Circle Slider in SwiftUI from 21% to 90% with 10 Steps
Автор: vlogize
Загружено: 2025-10-08
Просмотров: 1
Learn how to build a customizable Circle Slider in SwiftUI that allows users to select values from 21% to 90% with options for a starting value of 32% and '10 steps' increments.
---
This video is based on the question https://stackoverflow.com/q/64663511/ asked by the user 'lula08' ( https://stackoverflow.com/u/14270161/ ) and on the answer https://stackoverflow.com/a/64666470/ provided by the user 'Adrian' ( https://stackoverflow.com/u/8665577/ ) at 'Stack Overflow' website. Thanks to these great users and Stackexchange community for their contributions.
Visit these links for original content and any more details, such as alternate solutions, latest updates/developments on topic, comments, revision history etc. For example, the original title of the Question was: SwiftUI: How can I adjust the circle Slider/Picker
Also, Content (except music) licensed under CC BY-SA https://meta.stackexchange.com/help/l...
The original Question post is licensed under the 'CC BY-SA 4.0' ( https://creativecommons.org/licenses/... ) license, and the original Answer post is licensed under the 'CC BY-SA 4.0' ( https://creativecommons.org/licenses/... ) license.
If anything seems off to you, please feel free to write me at vlogize [AT] gmail [DOT] com.
---
Building a Custom Circle Slider in SwiftUI
If you're working with SwiftUI and want to implement an engaging way for users to input values—from a Circle Slider that adjusts selections between 21% to 90% with specific increments—you're in the right place! In this guide, we'll go through how to solve a common issue encountered when using a Circle Slider, and how to integrate different functionalities smoothly.
Understanding the Problem
You're looking to build a Circle Slider that allows users not only to select values in a specific range (from 21% to 90%), but also to have a unique selection behavior—displaying the values in 10 steps after crossing 50%. Additionally, you'd like to define a starting value of 32%. Implementing these features in SwiftUI can appear daunting at first, but with the following adjustments, you'll have a responsive circle slider ready for user interaction.
Setting Up Your Circle Slider
Initial Circle Slider Code
You might already have a working setup. For reference, here is the foundational structure of a basic circle slider:
[[See Video to Reveal this Text or Code Snippet]]
Modifying for Custom Ranges and Steps
To achieve the desired behavior, we need to modify the onDrag function and also set the starting value. Here’s how we do it:
Updating the Progress Calculation
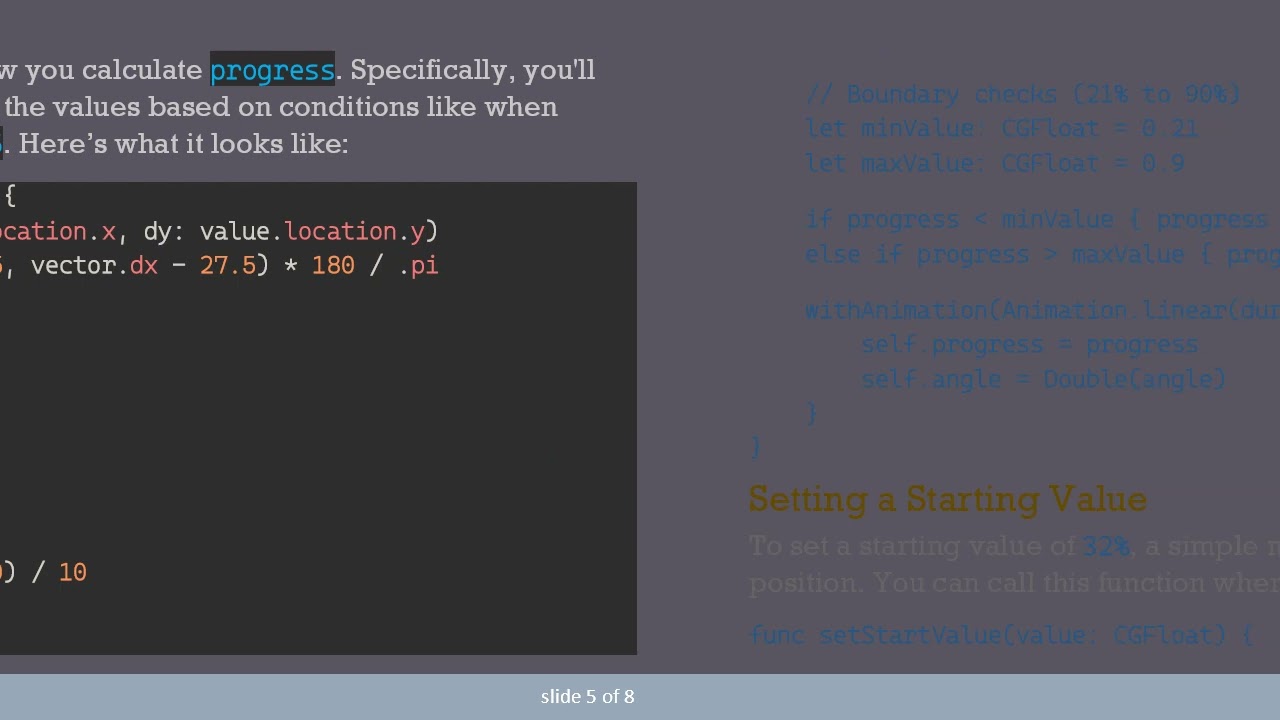
In the existing onDrag function, alter how you calculate progress. Specifically, you'll adjust both how you present and round the values based on conditions like when progress is greater than or equal to 0.5. Here’s what it looks like:
[[See Video to Reveal this Text or Code Snippet]]
Setting a Starting Value
To set a starting value of 32%, a simple method can be created to initialize the slider's position. You can call this function when the view appears:
[[See Video to Reveal this Text or Code Snippet]]
Using the onAppear Modifier
Integration of the starting value should occur when the view loads:
[[See Video to Reveal this Text or Code Snippet]]
Conclusion
With these changes, you now have a fully functional Circle Slider in SwiftUI that allows for a range of values from 21% to 90%, increments after 50%, and a starting value of 32%. This slider provides a much more controlled and intuitive experience for your users—perfect for applications that rely on precise inputs.
Feel free to implement your favorite styles and colors to enhance the user interface further. Happy coding!
Доступные форматы для скачивания:
Скачать видео mp4
-
Информация по загрузке:


