2012 NISSAN Altima - Audio Systems
Автор: Nissan Owner Channel
Загружено: 2015-04-19
Просмотров: 221796
Audio Systems (if so equipped)
If your vehicle is equipped with a Navigation System, please go to the Audio System with Navigation Chapter for further details.
Your audio system includes an FM/AM radio and CD player.
Press the center of the POWER/ VOLUME control to turn your system ON. Then turn the outside ring to adjust the volume.
Your radio will play FM and AM stations. Press the RADIO button to toggle between AM and FM radio bands.
To manually tune your radio, press the up or down arrows on the TUNE/ FAST-FORWARD/ REWIND button. Hold either arrow to quickly move through channels. Press and hold either arrow while playing a CD, to fast-forward or rewind.
To tune and stop at the next broadcast station, press the SEEK/ TRACK arrows up or down. If playing a CD, pressing the SEEK/TRACK button up will advance to the next track, while pressing the down arrow will return you to the beginning of the current track. Press either arrow several times to skip back and forth through multiple tracks.
When you press the SCAN button, it will seek out and stop for five seconds at each broadcasting station along the dial. When you reach a station you want to listen to, press again to stop scanning and stay there.
Pressing the SCAN button while playing CDs, will play the first ten seconds of each track on the CD. Pressing it again during the ten seconds, will stop the scan and that track will play in its entirety.
You can set up to 18 stations in memory using the PRESET ABC button. Press once and store up to six radio stations on Preset A. Press again to store six more stations each, on the B and C presets. You can store any combination of AM and FM station presets.
After selecting the A, B or C preset, tune to the desired station. Now press and hold the desired station button, one through six, until you hear a beep indicating that station is set in memory.
To play a stored preset, select the memory bank where it was stored, then press the desired station button, one through six.
To load a CD, the ignition must be at ACC or ON. Carefully insert the disc into the slot with the label side up. The CD will automatically be pulled into the slot and start to play. If the radio has been playing, it turns OFF and the CD begins.
While playing the radio, if you want to change to CD play, press the CD button. The radio will turn OFF and the disc will start to play.
Press the RANDOM/ REPEAT button while a CD is being played, to change the play pattern among random, repeat and normal play of discs and their tracks.
Press the DISPLAY button to show CD information on the audio display. If the text information is too long to be fully displayed onscreen, press and hold the DISPLAY button for longer than one and a half seconds, to scroll through available information.
To eject a CD, press the EJECT button.
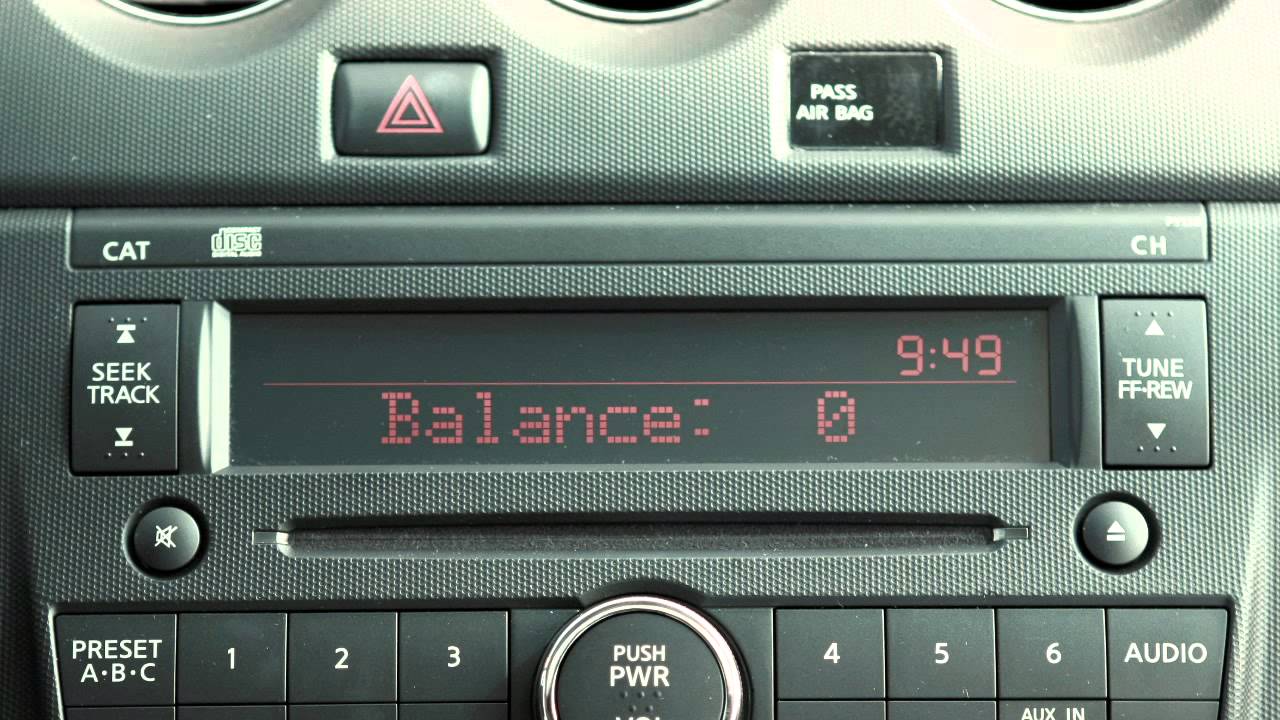
Press the AUDIO button to adjust: Bass, Treble, Fade, Balance and Beep functions. Simply press the AUDIO button repeatedly until the effect you want to adjust appears in the display. Then press the TUNE/ FAST-FORWARD/ REWIND button up or down to adjust to the desired level. Once adjustments have been made, press the AUDIO button again to return to radio or CD mode.
Press the MUTE button to cancel any currently playing audio sound. Press again to resume the previous sound level.
There is an auxiliary input jack and AUXILIARY button located on the front of your audio system. The jack accepts any standard analog input device, such as; a cassette tape player, CD player, MP3 player or laptop computer. After plugging in a device, press the AUXILIARY button to begin play.
If your vehicle is equipped with a USB jack, plug a compatible storage device, such as an iPod®, into the jack to play audio files stored on the device. Once the device is plugged into the jack, press the AUXILIARY button repeatedly to switch to the USB input mode.
To play an iPod®, connect the cable supplied with your iPod® to the USB jack, then connect the other end of the cable to your iPod®. If compatible, the battery of your iPod® will charge while connected to the vehicle. When plugged into the jack, only the audio system controls can be used to navigate and operate all iPod® functions.
Press the AUXILIARY button to choose from the following modes: Auxiliary, USB/ iPod® and Music Box® modes, if so equipped.
To adjust your clock, press and hold the CLOCK button for approximately two seconds. The display will show "H-Seek M-Tune," meaning that you will use the SEEK button to adjust hours and the TUNE button to adjust minutes. On these buttons, press up or down to adjust the time. Press the CLOCK button again to set and exit.
Please refer to your Owner's Manual for more information on all audio systems.
Доступные форматы для скачивания:
Скачать видео mp4
-
Информация по загрузке: