Популярное

Музыка Кино и Анимация Автомобили Животные Спорт Путешествия Игры Юмор

Интересные видео

2025 Сериалы Трейлеры Новости Как сделать Видеоуроки Diy своими руками

Топ запросов

смотреть а4 schoolboy runaway турецкий сериал смотреть мультфильмы эдисон
dTub
Скачать

How to Make a Teddy Bear - #3 Template Transfer and Cutting Fabric

Автор: Teddytech Online

Загружено: 2014-06-25

Просмотров: 348990

Описание:

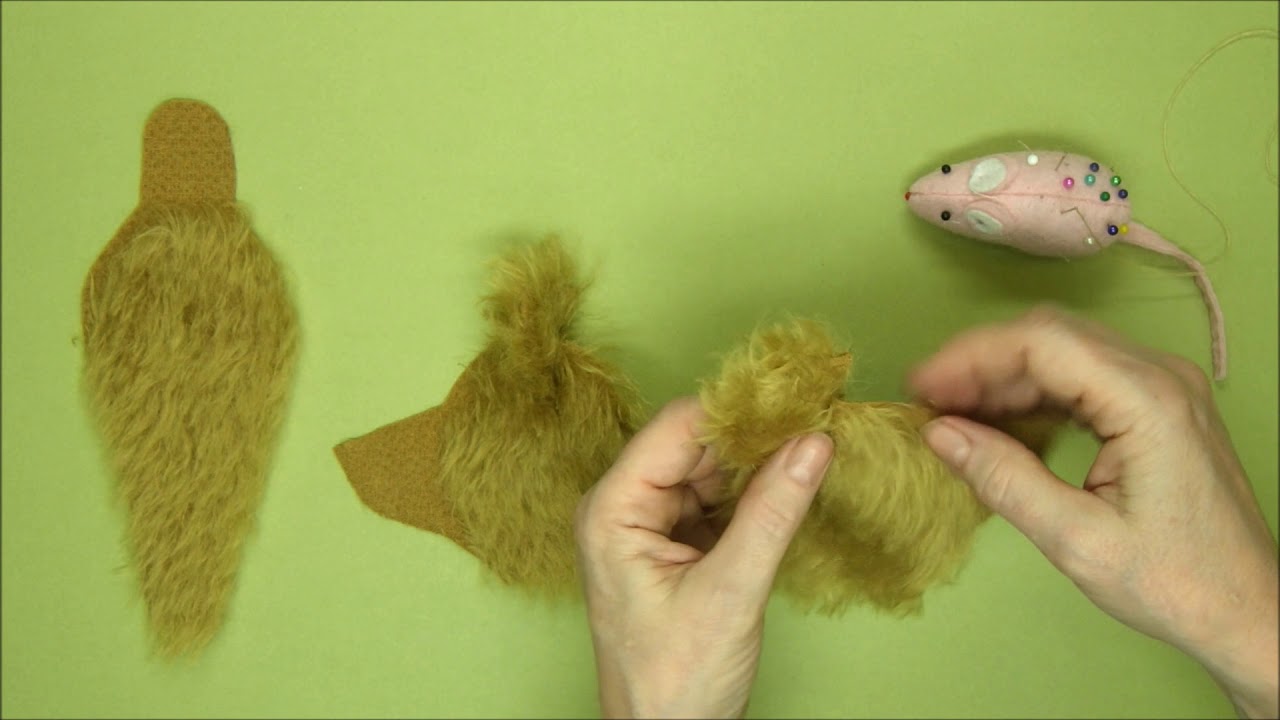
It's important to match the marked pile direction on your template with the pile direction of the fabric.

Pip downloadable PDF pattern: http://teddytech.biz/pip-pattern-down...
Buy Pip kit: http://teddytech.biz/pip-25cm-steiff-...

So before you start tracing out the shapes on to the back of the fur, do the following: With the fur side of the fabric facing you, slide your hand over the fur from the top to the bottom and from side to side. You will soon determine which way the pile is lying. If you reverse that action, you will note that your hand will not slide as easily over the pile and will push up against it. Once you have established which way the pile is lying, flip the fabric over so the backing faces you and carefully mark, with a gel pen, a small arrow along the edge (or selvedge) to indicate the pile direction. Then, match the pile direction on the template shape with the marked pile direction line. Place all your templates on the back of the fur before tracing, checking that the pile direction is matched, and butting the shapes up closely next to each other so as to utilise the fabric efficiently. Holding the template firmly in place wth one hand, carefully trace around the shape with a gel pen, ensuring that all the necessary marks are transferred, such as joint marks, openings, etc. Using a pair of small, sharp scissors and working from the backing side of the mohair, carefully cut each shape out on the inside of the marked line of each shape.You will be removing the ink line, (so, if you are hand sewing your bear, you won't transfer the ink line to your fingers and back on to the fur!). Once again, check that you have all the pieces cut out and store them in a zip-lock bag to avoid losing any pieces!

Tip: Carefully snip the backing only of the fabric (not through the fur) as you want to have some fur extending over the footpads, over the paw pads, over the top of the ears, etc. Practice with a scrap first!

How to Make a Teddy Bear - #3 Template Transfer and Cutting Fabric

Поделиться в:

Доступные форматы для скачивания:

Скачать видео mp4

  • Информация по загрузке:

Скачать аудио mp3

Похожие видео

How to Make a Teddy Bear - #4 Pinning Shapes Together

How to Make a Teddy Bear - #4 Pinning Shapes Together

How to Make a Teddy Bear - #10 Facial Features

How to Make a Teddy Bear - #10 Facial Features

Как сшить игрушечного медвежонка с эффектом памяти | Simplicity A2115: пошаговое руководство | Wh...

Как сшить игрушечного медвежонка с эффектом памяти | Simplicity A2115: пошаговое руководство | Wh...

Jointed Bear Making Project - Part 3 -Sewing The Head - Alice's Bear Shop

Jointed Bear Making Project - Part 3 -Sewing The Head - Alice's Bear Shop

Sew Confident Memory Bear Class Prep

Sew Confident Memory Bear Class Prep

Steiff Retail GmbH /  Original Produktfilm

Steiff Retail GmbH / Original Produktfilm

Как сделать медведя-памятника из одежды

Как сделать медведя-памятника из одежды

Teddy Bear DIY Step-by-Step Tutorial | How to make a plush teddy toy | Handmade | Sewing

Teddy Bear DIY Step-by-Step Tutorial | How to make a plush teddy toy | Handmade | Sewing

How to Make a Teddy Bear - #5 Stitching Shapes Together

How to Make a Teddy Bear - #5 Stitching Shapes Together

How Teddy Bear Is Made In Factory | Teddy Bear Production | Teddy Bear Manufacture

How Teddy Bear Is Made In Factory | Teddy Bear Production | Teddy Bear Manufacture

Attaching a Teddy Head to the Body by Hand

Attaching a Teddy Head to the Body by Hand

Part 3 Making a Jointed Fur Teddy Bear - Cutting the Fur

Part 3 Making a Jointed Fur Teddy Bear - Cutting the Fur

Jointed Bear Making Project - Part 2 -Sewing The Arms, Legs & Body - Alice's Bear Shop

Jointed Bear Making Project - Part 2 -Sewing The Arms, Legs & Body - Alice's Bear Shop

🔊БЕЗ ФОРМЫ/😍Огромный милый плюшевый мишка/👌Очень легко сделать

🔊БЕЗ ФОРМЫ/😍Огромный милый плюшевый мишка/👌Очень легко сделать

DIY Teddy Bear Plush

DIY Teddy Bear Plush

TEDDY BEAR DIY | Beginner friendly | How to make a plushie

TEDDY BEAR DIY | Beginner friendly | How to make a plushie

How to make teddy bear at home - soft toy making teddy bear at home [Free Template]

How to make teddy bear at home - soft toy making teddy bear at home [Free Template]

Part 2 Making A Jointed Teddy Bear - The Pattern

Part 2 Making A Jointed Teddy Bear - The Pattern

Soft Toys Big Teddy Bear

Soft Toys Big Teddy Bear

Adding to a teddy bear's nose

Adding to a teddy bear's nose

© 2025 dtub. Все права защищены.


  • Контакты
  • О нас
  • Политика конфиденциальности


Контакты для правообладателей: infodtube@gmail.com