Video tripod floor dolly to tripod track dolly conversion – using ABS pipe
Автор: Imaginet
Загружено: 2016-01-04
Просмотров: 63229
In this video I'm going to demonstrate how to convert and inexpensive tripod floor dolly into a very portable track dolly system, using ABS pipe for the rails.
I've had a tripod dolly for years and it has proven to be of limited use. The problem with these dollies is that they have to be used on extremely smooth surface such as a hardwood or polished concrete floor, which severely limits their usefulness.
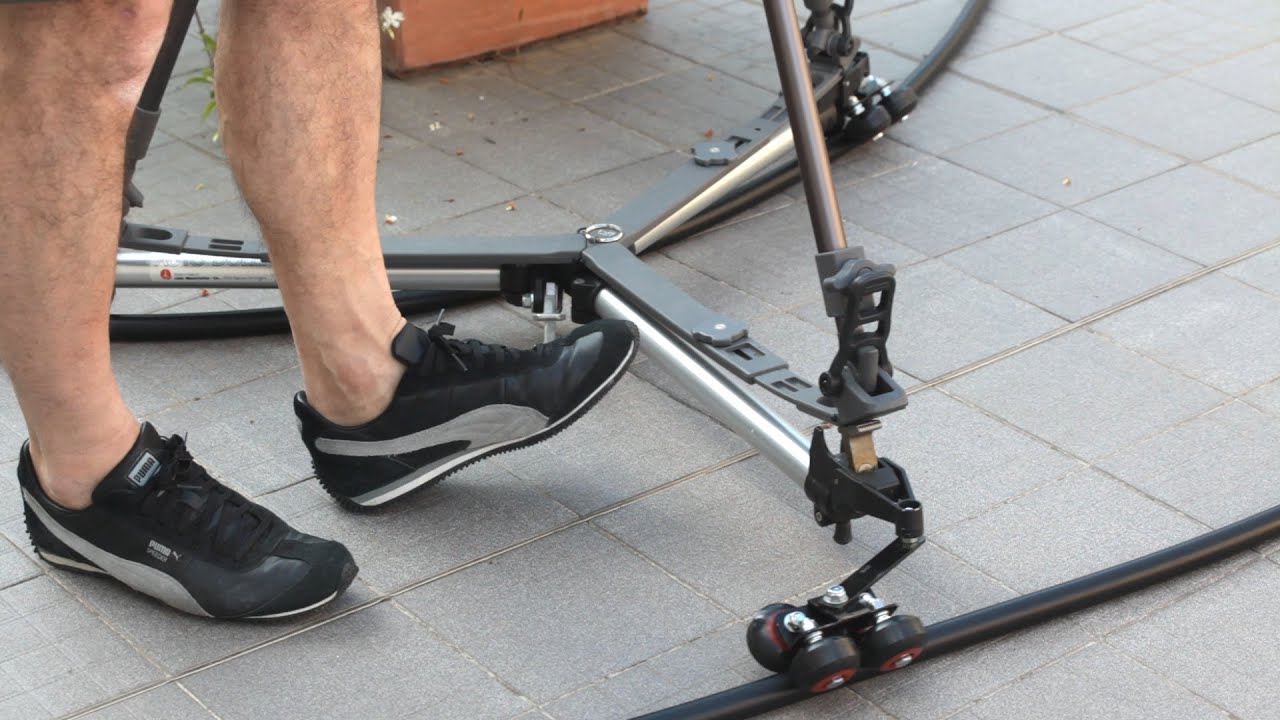
I found these track swivel wheels online. They are made by Glide Gear. As they were only $30, I decided to give them a try, as replacement for the 3 inch wheels, on my tripod dolly.
I removed the original wheels and discovered that the attaching bolt on the new wheelset, would be too long to fit in the threaded insert in the dolly. So, I picked up some one and a half inch by three eights stainless steel bolts at the local hardware store.
These Glide Gear swivel wheels are designed to have some lateral movement that makes fine adjustments on the track very easy and almost self adjusting.
After replacing the bolts, I tightened the nut, being careful to make sure there's just enough tension to allow the wheels to swivel, and, to slide side to side.
For the track, I used one and a quarter inch ABS DWV drain pipe, which can be picked up at your local hardware store. I started with two, twelve foot lengths, which I cut back to 9.5 feet, simply for portability and transport reasons. The two cut off pieces will be used for cross pieces.
I picked up another six-foot length which was used to make two more cross pieces.
In order for the cross pieces to snap in and stay securely in place, they have to be drilled offset, such that the radius point is higher than the center of the rail. This forms a C shape which allows the cross pieces to snap securely onto the rail.
I measured the outside diameter of the pipe and found that a one and five eighths inch hole saw would be an almost perfect size, to match the outside diameter of the pipe.
To determine the width of the cross pieces,I laid the rails down making sure they were parallel to each other. I then set the dolly on top, making sure that all the wheels were flush with the rail on both sides.
My rails need to be 25 1/2 inches apart, so cutting the cross pieces at 30 inches, would leave 1 inch on either end. I then made the cuts on the circular saw.
Both drilled holes in each cross piece need to be perfectly aligned with each other. I found it was easier just to see my marks, if I used masking tape.
Aligning the pipe with the edge of my workbench and holding it tight, I mark centerline at both ends of the pipe.
To help hold the pipe in place while I was drilling the holes, I drilled a Half circle using the hole saw through a block of wood and then clamped that to the pipe. I then clamped the other rent in place once I had it properly aligned.
You can see the hole is offset, as the guide bit is passing through the inside of of the rail.
I cleaned up the rough edges with A dremel, and gave it a test fit. Perfect.
To stop the dolly from sliding off the end of the rails, I cut two more small sections and use them as stop blocks which just snap in place.
The track can be extended as long as required by using additional lengths of pipe. To join them, simply slide short section of inch and a quarter doweling into one pipe, and then slide the next section over top, creating a near seamless joint that they Glide gear wheels can smoothly slide over.
To attach the cross pieces, slide them underneath the rails and snap them in place. For my 9 1/2 foot sections, I used 4 cross pieces.
Next set the track dolly on the rails and add the stop blocks.
The tripod legs drop in to the adjustable receptacles on the three ends of the dolly arms. There are screw locks on each one that prevent the leg from slipping off the dolly.
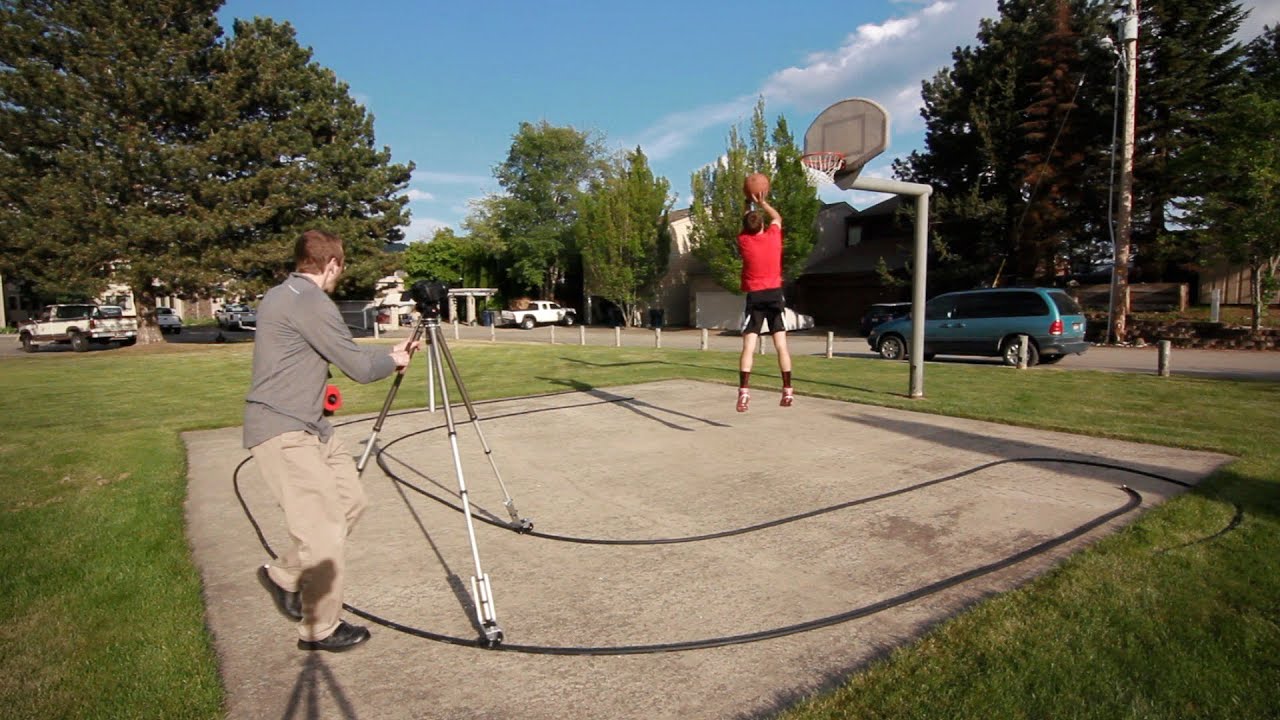
The movement is silky smooth. This would have been impossible to achieve using the original dolly wheels on a surface like this.
Once snapped together, the full system can be moved around and repositioned as one unit. This makes it extremely flexible and easy for moving around from shot to shot
To disassemble, apply slight pressure downward on the cross pieces, and then pop the rails off.
Overall, this modification turned out better than I could've imagined. It is relatively inexpensive and works as well as other dolly track systems out there, that cost hundreds of dollars more.
It is flexible, easily expandable, snaps together quickly, and is extremely portable.
I hope you found this video and DIY project helpful, and maybe it will encourage you and others come up with some more innovative photography and filmmaking solutions.

Доступные форматы для скачивания:
Скачать видео mp4
-
Информация по загрузке:


![[DIY] Je fabrique ma DOLLY // TRAVELING](https://imager.clipsaver.ru/Z23Xpf3WvuM/max.jpg)


