Forging a Tomahawk with Benton Frisse
Автор: BeaumontMetalWorks
Загружено: 2022-04-13
Просмотров: 310
In this tomahawk forging video, Benton Frisse demonstrates the blacksmithing work of heating and hammering steel to forge a traditional wrap-style tomahawk. He uses a gas forge, an anvil, a 2 pound 14 ounce (2-7/8 pounds) blacksmith hammer with flat square face, a cross pein hammer, tongs and a drift in this tutorial. Benton uses a kit designed by Stephen Feinstein and Ryan Johnson with A36 mild steel pre-cut body blank with a higher carbon 1084 steel bit insert for a harder cutting edge.
Benton Frisse began learning to be blacksmith at age 11 with his step-dad. Later he attended the New England School of Metalwork in order to become a professional blacksmith. Mr. Frisse participated in Forged in Fire season 6 episode 27 where he was tasked with recreating an Indian Bhuj. For more than a decade Mr. Frisse has been creating hand-forged, high quality heirlooms and heritage tools such as axes at his business River City Forge and Tool in Evansville, Indiana, USA.
Contents
1:05 Step 1: Fold the Tomahawk body blank into a symmetrical U-shape. The is best done using the edge of the anvil. Pinch the workpiece to allow space for the 1084 high carbon insert.
1:28 Step 2: Insert the carbon bit and prepare for welding. Benton usually starts out with the body of the tomahawk hot and the bit cold. Then once the positioning is close, take it over to the MIG welder and spot weld it to hold the 1084 steel bit in place. This will keep the bit from moving around during the forge welding process.
1:50 Step 3: Flux the tomahawk blank. Get as much flux as possible all over the openings to ensure all the weld surfaces are clean, with minimal impurities, to control delaminations.
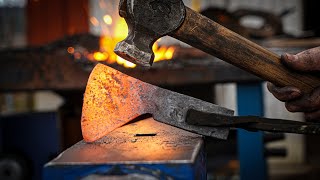
2:09 Step 4: set the first weld. This can be done on the anvil with a hammer with light, quick blows. Here, Benton uses his Coal Iron Works forging press to get a solid first set-weld.
2:25 Step 5: Weld again. After the initial set weld, it is important to forge weld at least 2 or 3 more times. Often, if you think something is forge welded, it is not.
2:42: Step 6: weld again using the heat, the tongs, and the flat hammer on the anvil. It is difficult to get enough heat for proper forge welding, and doing it multiple times is a good practice to make a more complete forge weld.
2:49 Step 7: weld again.
2:59 Step 8: weld again with heat, tongs, the flatter and the anvil. A small delamination was present on the spine showing that further heat and forge welding was necessary.
3:06 Step 9: Fuller and spread the tomahawk blade using a cross pein hammer with a steady stream of blows on work held at the anvil’s hardened face. The flat hammer is useful for evening the surface of the tomahawk between peinings. This is where the shape, the design and the character of the tomahawk really comes to life.
3:27 Step 10 Refine the profile. Use hardy tools and different surfaces of the anvil to impart a steeper beard and wider blade into the tomahawk.
4:04 Step 11: refine the eye of the tomahawk. Resize and shape the eye using a drift punch. Do not drift open the handle hole too hard - even a good solid weld on the blade side can be busted open if you’re not careful.
4:35 Step 12: Draw the tomahawk blade length-wise to produce a tapered profile that will help the tomahawk bite deep into wood surfaces during use. Benton uses a power hammer for this.
4:55 Step 13: Trim excess steel once the profile is created. This keeps the bit at an even thickness and allows you to easily access the carbon layer for grinding the sharp edge. Benton uses a classic KMG 2x72 belt grinder from Beaumont Metal Works for grinding and sharpening his work.
5:14 Step 14: Stamp your makers mark on the tomahawk. It is important to set the mark with one single sold hit, and then flip the workpiece over and give it one more solid hit on the opposite side of the makers mark to offset and counterbalance any crookedness form the makers mark hit. Benton uses his River City Forge makers mark.
5:47 Step 15: Move on to final grinding with the KMG 2x72 belt grinder, heat treat, sharpening using the Beaumont KMG belt sander, and final assembly.
5:54 Here is a view of the finished tomahawk. It is ready for a handle, razor sharp and tempered to 57 rockwell hardness.
Shop BeuamontMetalWorks.com for belt grinders (2x72 belt sanders) such as the classic KMG and the KMG-TX, as well as disk grinders, parts, accessories and bundle packages for grinders . Our grinders / sanders are robust, simple and versatile, and proven to last for decades of trusted use for blacksmiths, bladesmiths, metal makers, fabricators, steel artists and creators.

Доступные форматы для скачивания:
Скачать видео mp4
-
Информация по загрузке: