How To Convert Low-Res To High-Res Graphic In Photoshop
Автор: Brendan Williams
Загружено: 2025-07-24
Просмотров: 12613
Learn How To Upgrade Low Res Graphics To High Resolution In Photoshop! 📝 GET THE FREE LESSON CHEAT SHEET PDF here 👉 https://bwillcreative.kit.com/low-res...
—
😄 TRY PHOTOSHOP FOR FREE: https://prf.hn/l/0e9YJxb/
Ultimate Blending Modes Visual Reference: https://www.bwillcreative.com/blendin...
🤓 **JOIN MY BEGINNER PHOTOSHOP PROGRAM:** https://www.bwillcreative.com/photosh...
👨🏫 **MASTER PHOTOSHOP FOR PHOTOGRAPHY:** https://www.bwillcreative.com/21-day-...
✏️ **MASTER PHOTOSHOP SELECTIONS IN THIS COURSE:** https://www.bwillcreative.com/selecti...
🌐 VISIT MY WEBSITE for 700+ free Photoshop & Lightroom guides: https://www.bwillcreative.com/
👥 MY SOCIAL MEDIA
Instagram: / brnwills
Facebook: / brnwills
Portfolio: https://portfolio.bwillcreative.com/
Email: [email protected]
—
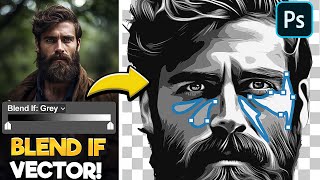
In this video, you'll learn how to turn a low-resolution black-and-white graphic into a crisp, high-resolution version using two different Photoshop methods. First, we upscale the image by adjusting its dimensions, giving us a better starting point. Method 1 focuses on sharpening edges using Gaussian Blur and Curves to remove unwanted gray areas and boost contrast. Method 2 takes it further using the Quick Selection Tool and the Select & Mask workspace, where we fine-tune edges with global refinements like Smooth, Feather, and Contrast. To clean up any remaining rough spots, we use a soft brush in Overlay mode to blend and refine small sections of the image. Both approaches are effective for different types of graphics, so you’ve got options.
Ever had to bring a pixelated image back to life? Give these techniques a shot and let me know which one gave you the cleanest results!
—
Timestamps:
0:00 Method 1: Filters To Enhance Edges
5:12 Method 2: Select & Mask
9:24 Fixing Messy Edges After Enhancements
13:02 Comparing Methods - What’s Best?

Доступные форматы для скачивания:
Скачать видео mp4
-
Информация по загрузке: