Cricut Veneer Clock
Автор: The Woodworks by David Wood
Загружено: 2023-01-02
Просмотров: 3034
Hi and welcome to my tutorial on how to make a veneer inlay clock using a Cricut Maker machine. This will make two contrasting clocks at once.
In this video, we'll be showing you how to use your Cricut Maker to cut out the pieces for a beautiful veneer inlay clock. This project is perfect for woodworkers of all skill levels, and the end result is a stunning and unique clock that you'll be proud to display in your home.
To get started, you'll need a few supplies:
• 2 -12”x12” Veneer sheets I chose maple and walnut for a good contrast.
• Two 10”x10” solid wood of your chose. They can by glued up from scrap wood.
• Clock face SVG or template
• Painters Masking tape
• Woodworking glue
• Clock hands and movement kit
• Finishing oil or clear coat
Tools you will need:
• Cricut Maker with a fine-point blade
• Saw or router to cut a circle.
• Router
• Round over bit
• Straight cutter bit
• Sander
The first step is to choose your design for the clock face. There are many clock face templates and SVS on line.
In Cricut Design Space software, upload you image. Now you can cut the image as is, but I want it a little different. In Photoshop I made a layer of the clockface outline without the letters and numbers, and one of just the letters and numbers. Now here are the file in Design Space. Once you've created your design, you'll need to size it to fit your clock movement kit. Select all and resize to 8 ½”x8 ½”. Now to adjust the numbers to fit the original file. Turn on the two layer and select the numbers layer. With the constraints unlocked resize the numbers to fit the original. Now you can turn off all the layers and only cut the outline layer.
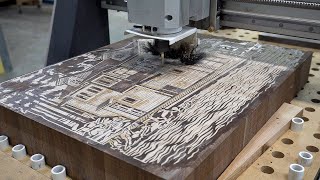
Next, cut out your design using the Cricut Maker. You'll need to use a fine-point blade and a deep stick matt. Set the machine to cut veneer. I use the more setting, be sure to use masking tape on top of the veneer to help it stay in place while cutting. Check it before you remove the matt from the machine. If its not cut all the way through press the cut button again to make another pass. Repeat this with the other sheet of veneer.
Once your pieces are cut, it's time to start inlaying them into your clock face. Carefully remove all the cutout without damaging any parts. Some parts might need help from a knife. Place the clock face down on the deep stick matt and fill in the cutouts with the contrasting veneer. The very small cutouts I will just leave empty. The wood below will be visible. Once all the parts are in place, tape them with the painter’s tape and carefully remove from the matt. Repeat this with the other veneer.
Next the two solid wood blanks need to be cut in a circle. There are many ways to do this. From a hand saw to a router jig, I just made a quick jig for the band saw to cut the circles I need. Sand the outside smooth and use the round-over bit on the edges. You can always just sand the edge if you want. Next drill a 7/16” hole through the center and trace the clock body on the back of the circle. Using the straight cutter in the router, rout out for the clock motor, deep enough for the clock shaft to stick though for the hands.
Now you ready for the veneer. Sand and clean off all dust on the blanks. Mark the center of the top of the blank and the top of the veneer. Use a glue roller to apply a light layer of wood glue on the back of the veneer. Center the veneer and hold in place with some tape. Repeat with the other clock. Now with waxed paper between the clocks, clamp together and let dry.
When dry remove the tape and sand with 150 grit sandpaper. Be careful not to sand through the thin veneer.
Now for the numbers. Back at the Cricut I’m using a chrome/gold permanent vinyl, you can use any color you want, but I’m looking for that brass look. Weed and use transfer paper. Center the numbers starting from the top slowly peal back the transfer paper.
You can use a finishing oil or clear coat to protect the veneer and give the clock a beautiful shine. Just be sure to follow the instructions on the product you're using and allow plenty of drying time before reassembling your clock.
Finally, it's time to attach the clock hands and movement kit. Simply follow the instructions that come with your kit to attach the hands and set the time.
Please leave a comment and subscribe to my channel to see more.
Here are the project links:
Clock face template: https://stock.adobe.com/images/laser-...
Clock movement kit:https://www.amazon.com/Pieces-Movemen...

Доступные форматы для скачивания:
Скачать видео mp4
-
Информация по загрузке: