Популярное

Музыка Кино и Анимация Автомобили Животные Спорт Путешествия Игры Юмор

Интересные видео

2025 Сериалы Трейлеры Новости Как сделать Видеоуроки Diy своими руками

Топ запросов

смотреть а4 schoolboy runaway турецкий сериал смотреть мультфильмы эдисон
dTub
Скачать

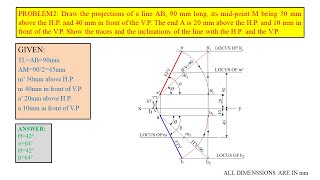
EXERCISES(10A) PROJECTIONS OF STRAIGHT LINES-1 SOLUTIONS (ENGINEERING DRAWING BY N.D.BHATT TEXTBOOK)

Автор: RAKESH VALASA

Загружено: 2020-11-10

Просмотров: 194066

Описание:

#projections_of_straight_lines-1 #rakesh_valasa


1(a). Draw the projections of a 75 mm long straight line, in the following positions.
(i) parallel to both the H.P. and the V.P. and 25 mm from each
(ii) Parallel to and 30 mm above the H.P. and in the V.P.
(iii) Parallel to and 40 mm in front of the V.P. and in the H.P.


b
i) Perpendicular to the H.P., 20 mm in front of the V.P. and its one end 15 mm above the H.P.
ii) Perpendicular to the V.P., 25 mm above the H.P. and its one end in the V.P.
iii) Perpendicular to the H.P, in the V.P. and its one end in the H.P.


c
(i) inclined at 45° to the V.P., in the H.P. and it’s one end in the V.P.
(ii) inclined at 30° to the H.P. and it’s one end 20 mm above it; parallel to and 30 mm in front of the V.P.
(iii) Inclined at 60° to the V.P. and its one end 15mm in front of it; parallel to and 25 mm above the H.P.


2. A 100 mm long line is parallel to and 40 mm above H.P. Its two ends are 25 mm and 50 mm in front of the V.P. respectively. Draw its projections and find its inclination with the V.P.


3. A 90mm long line is parallel to and 25mm in front of the V.P. Its one end is in the H.P. while the other is 50 mm above the H.P. Draw its projections and find its inclination with the HP.


4. The top view of a 75 mm long line measures 55 mm. The line is in the V.P. its one end being 25 mm above the H.P. Draw its projections.


5. The front view of a line, inclined at 30° to the V.P. is 65 mm long. Draw the projections of the line, when it is parallel to and 40 mm above the H.P., its one being 30 mm in front of the V.P.


6. A vertical line AB, 75 mm long, has its end A in the H.P. and 25 mm in front of the V.P. A line AC, 100 mm long, is in the H.P. and parallel to the V.P Draw the projections of the line joining B and C, and determine its inclination with the H.P.


7. Two pegs fixed on a wall are 4.5 meters apart. The distance between the pegs measured parallel to the floor is 3.6 meters. If one peg is 1.5 meters above the floor, find the height of the second peg and the inclination of the line joining the two pegs, with floor.


projections of ponts
   • PROJECTIONS OF POINTS  

projections of straight lines-1
   • PROJECTIONS OF STRAIGHT LINES - I  

projections of straight lines-2
   • PROJECTIONS OF STRAIGHT LINES - II  

projections of planes
   • PROJECTIONS OF PLANES  

projections of solids-1
   • Projections of solids-I  

projections of solids-2
   • Projections of solids-II  

sections of solids
   • Sections of Solids  

orthographic projections
   • Orthographic projections  

isometric projections
   • Isometric projections  

Engineering drawing MSE-1
   • Engineering Drawing MSE-I question papers ...  

Engineering drawing MSE-2
   • Engineering drawing MID-II question papers...  

Engineering drawing ESE
   • Engineering Drawing ESE Question papers wi...  

Engineering drawing BITS
   • Engineering Drawing (TOP-100 Bits) questio...  

AUTOCAD
   • AutoCAD Lab  

Computer aided analysis lab (FEM LAB)
   • CAA LAB  

MATLAB
   • Matlab  

Automobile Engineering
   • Automobile Engineering  

Finite element methods
   • Finite element methods  

CATIA
   • CATIA  

Computational methods in engineering
   • Computational methods in Engineering  

mechanical subject MCQ
   • Dynamics of machinery  MCQ  

EXERCISES(10A) PROJECTIONS OF STRAIGHT LINES-1 SOLUTIONS (ENGINEERING DRAWING BY N.D.BHATT TEXTBOOK)

Поделиться в:

Доступные форматы для скачивания:

Скачать видео mp4

  • Информация по загрузке:

Скачать аудио mp3

Похожие видео

array(20) { ["2u4dGKs0yi4"]=> object(stdClass)#7757 (5) { ["video_id"]=> int(9999999) ["related_video_id"]=> string(11) "2u4dGKs0yi4" ["related_video_title"]=> string(84) "problem no. 1(b), Projections of straight lines-1 [Engineering drawing by N.D.BHATT]" ["posted_time"]=> string(19) "6 лет назад" ["channelName"]=> NULL } ["rCcLJ3_4EXo"]=> object(stdClass)#7762 (5) { ["video_id"]=> int(9999999) ["related_video_id"]=> string(11) "rCcLJ3_4EXo" ["related_video_title"]=> string(40) "Full Video- Projection Of Points & Lines" ["posted_time"]=> string(19) "5 лет назад" ["channelName"]=> NULL } ["HfxmE57kziY"]=> object(stdClass)#7755 (5) { ["video_id"]=> int(9999999) ["related_video_id"]=> string(11) "HfxmE57kziY" ["related_video_title"]=> string(102) "Ортографические проекции в инженерной графике. Задача 3" ["posted_time"]=> string(21) "2 года назад" ["channelName"]=> NULL } ["PLGkoY1NcxeIYuZrBuvQIqMLCjMh4OVB5D"]=> object(stdClass)#7760 (5) { ["video_id"]=> int(9999999) ["related_video_id"]=> string(34) "PLGkoY1NcxeIYuZrBuvQIqMLCjMh4OVB5D" ["related_video_title"]=> string(33) "PROJECTIONS OF STRAIGHT LINES - I" ["posted_time"]=> string(0) "" ["channelName"]=> NULL } ["PLGkoY1NcxeIYompl7lAi84oZbhLo_UAxw"]=> object(stdClass)#7749 (5) { ["video_id"]=> int(9999999) ["related_video_id"]=> string(34) "PLGkoY1NcxeIYompl7lAi84oZbhLo_UAxw" ["related_video_title"]=> string(34) "PROJECTIONS OF STRAIGHT LINES - II" ["posted_time"]=> string(0) "" ["channelName"]=> NULL } ["PLGkoY1NcxeIbh3bVe98O3E9wk_p6_o9Zq"]=> object(stdClass)#7764 (5) { ["video_id"]=> int(9999999) ["related_video_id"]=> string(34) "PLGkoY1NcxeIbh3bVe98O3E9wk_p6_o9Zq" ["related_video_title"]=> string(21) "PROJECTIONS OF POINTS" ["posted_time"]=> string(0) "" ["channelName"]=> NULL } ["PLDN15nk5uLiC9wFOTiDp8ekWAf40BwSct"]=> object(stdClass)#7753 (5) { ["video_id"]=> int(9999999) ["related_video_id"]=> string(34) "PLDN15nk5uLiC9wFOTiDp8ekWAf40BwSct" ["related_video_title"]=> string(49) "PROJECTION OF STRAIGHT LINE - BY TIKLE'S ACADEMY" ["posted_time"]=> string(0) "" ["channelName"]=> NULL } ["qtUSqCGFdCU"]=> object(stdClass)#7768 (5) { ["video_id"]=> int(9999999) ["related_video_id"]=> string(11) "qtUSqCGFdCU" ["related_video_title"]=> string(47) "Line inclined to both HP and VP | Basic concept" ["posted_time"]=> string(19) "1 год назад" ["channelName"]=> NULL } ["E3Maruz9tg0"]=> object(stdClass)#7743 (5) { ["video_id"]=> int(9999999) ["related_video_id"]=> string(11) "E3Maruz9tg0" ["related_video_title"]=> string(79) "Первичная идея дифференциальной геометрии" ["posted_time"]=> string(19) "2 дня назад" ["channelName"]=> NULL } ["3pTN2nYxt5w"]=> object(stdClass)#7765 (5) { ["video_id"]=> int(9999999) ["related_video_id"]=> string(11) "3pTN2nYxt5w" ["related_video_title"]=> string(57) "🔥Дневной выпуск новостей 18.11.25" ["posted_time"]=> string(21) "4 часа назад" ["channelName"]=> NULL } ["RFYmgyWhKPI"]=> object(stdClass)#7756 (5) { ["video_id"]=> int(9999999) ["related_video_id"]=> string(11) "RFYmgyWhKPI" ["related_video_title"]=> string(123) "⚡️КРАЙНЯЯ СТЕПЕНЬ НЕКОМПЕТЕНЦИИ! ЗА СТРАНУ СТРАШНО! Доктор Редько" ["posted_time"]=> string(23) "8 часов назад" ["channelName"]=> NULL } ["HIYelmlm0nk"]=> object(stdClass)#7761 (5) { ["video_id"]=> int(9999999) ["related_video_id"]=> string(11) "HIYelmlm0nk" ["related_video_title"]=> string(102) "Ортографические проекции в инженерной графике. Задача 4" ["posted_time"]=> string(21) "2 года назад" ["channelName"]=> NULL } ["I20ujDIDgH0"]=> object(stdClass)#7750 (5) { ["video_id"]=> int(9999999) ["related_video_id"]=> string(11) "I20ujDIDgH0" ["related_video_title"]=> string(136) "Логистика Северска перерезана: НАЧАЛСЯ ШТУРМ города! Военные сводки 18.11.2025" ["posted_time"]=> string(24) "11 часов назад" ["channelName"]=> NULL } ["mktP9OWc5NE"]=> object(stdClass)#7748 (5) { ["video_id"]=> int(9999999) ["related_video_id"]=> string(11) "mktP9OWc5NE" ["related_video_title"]=> string(97) "Решенные проблемы — линия наклонена как к HP, так и к VP" ["posted_time"]=> string(19) "5 лет назад" ["channelName"]=> NULL } ["Kh610NuTFIY"]=> object(stdClass)#7746 (5) { ["video_id"]=> int(9999999) ["related_video_id"]=> string(11) "Kh610NuTFIY" ["related_video_title"]=> string(54) "Пример 01 по проецированию тел" ["posted_time"]=> string(19) "5 лет назад" ["channelName"]=> NULL } ["DjwplOxIFm4"]=> object(stdClass)#7747 (5) { ["video_id"]=> int(9999999) ["related_video_id"]=> string(11) "DjwplOxIFm4" ["related_video_title"]=> string(149) "ЗАДАЧА № 2 ПРОЕКЦИИ ПРЯМЫХ ЛИНИЙ-II (Инженерный чертеж Н.Д.БХАТТА) ​​с пояснениями" ["posted_time"]=> string(21) "3 года назад" ["channelName"]=> NULL } ["GtlKSayZl6s"]=> object(stdClass)#7744 (5) { ["video_id"]=> int(9999999) ["related_video_id"]=> string(11) "GtlKSayZl6s" ["related_video_title"]=> string(119) "Как рисовать проекции тел (квадратная призма): наклонные к H.P. и V.P." ["posted_time"]=> string(21) "4 года назад" ["channelName"]=> NULL } ["ht9GwXQMgpo"]=> object(stdClass)#7745 (5) { ["video_id"]=> int(9999999) ["related_video_id"]=> string(11) "ht9GwXQMgpo" ["related_video_title"]=> string(56) "Понимание инженерных чертежей" ["posted_time"]=> string(21) "3 года назад" ["channelName"]=> NULL } ["4J5ymqmb4Jc"]=> object(stdClass)#7733 (5) { ["video_id"]=> int(9999999) ["related_video_id"]=> string(11) "4J5ymqmb4Jc" ["related_video_title"]=> string(107) "Хейтерша ЗАМАНИЛА МОЮ ДЕВУШКУ на свой Сервер в Майнкрафт..." ["posted_time"]=> string(23) "6 часов назад" ["channelName"]=> NULL } ["nvJ8QEYyYCI"]=> object(stdClass)#7734 (5) { ["video_id"]=> int(9999999) ["related_video_id"]=> string(11) "nvJ8QEYyYCI" ["related_video_title"]=> string(164) "Инженерный чертёж | Проекция плоскостей – Круглая пластина – Задача 04 | Учитесь с Нихилом" ["posted_time"]=> string(21) "4 года назад" ["channelName"]=> NULL } }
problem no. 1(b), Projections of straight lines-1 [Engineering drawing by N.D.BHATT]

problem no. 1(b), Projections of straight lines-1 [Engineering drawing by N.D.BHATT]

Full Video- Projection Of Points & Lines

Full Video- Projection Of Points & Lines

Ортографические проекции в инженерной графике. Задача 3

Ортографические проекции в инженерной графике. Задача 3

PROJECTIONS OF STRAIGHT LINES - I

PROJECTIONS OF STRAIGHT LINES - I

PROJECTIONS OF STRAIGHT LINES - II

PROJECTIONS OF STRAIGHT LINES - II

PROJECTIONS OF POINTS

PROJECTIONS OF POINTS

PROJECTION OF STRAIGHT LINE -  BY TIKLE'S ACADEMY

PROJECTION OF STRAIGHT LINE - BY TIKLE'S ACADEMY

Line inclined to both HP and VP | Basic concept

Line inclined to both HP and VP | Basic concept

Первичная идея дифференциальной геометрии

Первичная идея дифференциальной геометрии

🔥Дневной выпуск новостей 18.11.25

🔥Дневной выпуск новостей 18.11.25

⚡️КРАЙНЯЯ СТЕПЕНЬ НЕКОМПЕТЕНЦИИ! ЗА СТРАНУ СТРАШНО! Доктор Редько

⚡️КРАЙНЯЯ СТЕПЕНЬ НЕКОМПЕТЕНЦИИ! ЗА СТРАНУ СТРАШНО! Доктор Редько

Ортографические проекции в инженерной графике. Задача 4

Ортографические проекции в инженерной графике. Задача 4

Логистика Северска перерезана: НАЧАЛСЯ ШТУРМ города! Военные сводки 18.11.2025

Логистика Северска перерезана: НАЧАЛСЯ ШТУРМ города! Военные сводки 18.11.2025

Решенные проблемы — линия наклонена как к HP, так и к VP

Решенные проблемы — линия наклонена как к HP, так и к VP

Пример 01 по проецированию тел

Пример 01 по проецированию тел

ЗАДАЧА № 2 ПРОЕКЦИИ ПРЯМЫХ ЛИНИЙ-II (Инженерный чертеж Н.Д.БХАТТА) ​​с пояснениями

ЗАДАЧА № 2 ПРОЕКЦИИ ПРЯМЫХ ЛИНИЙ-II (Инженерный чертеж Н.Д.БХАТТА) ​​с пояснениями

Как рисовать проекции тел (квадратная призма): наклонные к H.P. и V.P.

Как рисовать проекции тел (квадратная призма): наклонные к H.P. и V.P.

Понимание инженерных чертежей

Понимание инженерных чертежей

Хейтерша ЗАМАНИЛА МОЮ ДЕВУШКУ на свой Сервер в Майнкрафт...

Хейтерша ЗАМАНИЛА МОЮ ДЕВУШКУ на свой Сервер в Майнкрафт...

Инженерный чертёж | Проекция плоскостей – Круглая пластина – Задача 04 | Учитесь с Нихилом

Инженерный чертёж | Проекция плоскостей – Круглая пластина – Задача 04 | Учитесь с Нихилом

© 2025 dtub. Все права защищены.


  • Контакты
  • О нас
  • Политика конфиденциальности


Контакты для правообладателей: [email protected]