Creating a Line Chart in SwiftUI
Автор: vlogize
Загружено: 2025-10-03
Просмотров: 4
Learn how to effortlessly draw a `line chart` in SwiftUI using simple steps. This guide breaks down the process, complete with code examples and explanations.
---
This video is based on the question https://stackoverflow.com/q/62995435/ asked by the user 'NMM_Dev' ( https://stackoverflow.com/u/13963279/ ) and on the answer https://stackoverflow.com/a/62995574/ provided by the user 'Asperi' ( https://stackoverflow.com/u/12299030/ ) at 'Stack Overflow' website. Thanks to these great users and Stackexchange community for their contributions.
Visit these links for original content and any more details, such as alternate solutions, latest updates/developments on topic, comments, revision history etc. For example, the original title of the Question was: Drawing a line chart in SwiftUI
Also, Content (except music) licensed under CC BY-SA https://meta.stackexchange.com/help/l...
The original Question post is licensed under the 'CC BY-SA 4.0' ( https://creativecommons.org/licenses/... ) license, and the original Answer post is licensed under the 'CC BY-SA 4.0' ( https://creativecommons.org/licenses/... ) license.
If anything seems off to you, please feel free to write me at vlogize [AT] gmail [DOT] com.
---
Drawing a Line Chart in SwiftUI: A Step-by-Step Guide
Creating visualizations in your apps can significantly enhance user experience, and one popular visualization is the line chart. If you're developing with SwiftUI and running into errors while trying to draw a line chart, you're not alone! Let's break down the problem and provide a clear solution so you can add that line chart to your project with ease.
Understanding the Problem
Many developers encounter issues when trying to implement loops within the drawing context of SwiftUI. If you're trying to create a line chart using the Path representation and experiencing build errors like this:
[[See Video to Reveal this Text or Code Snippet]]
You're likely mixing up the use of ForEach with standard loops. This is a common pitfall and fortunately, it can be resolved with some simple adjustments.
The Solution
To successfully draw a line chart in SwiftUI, you can use the for loop instead of ForEach. Here’s how you can implement it step-by-step:
Step-by-Step Implementation
Initialize the Path:
Start by creating a Path that will hold the points for your line chart.
Move to the Starting Point:
Use the move(to:) method to set the starting point of your line chart.
Loop Through Your Data:
Instead of using ForEach, use a standard for loop to iterate through your data points.
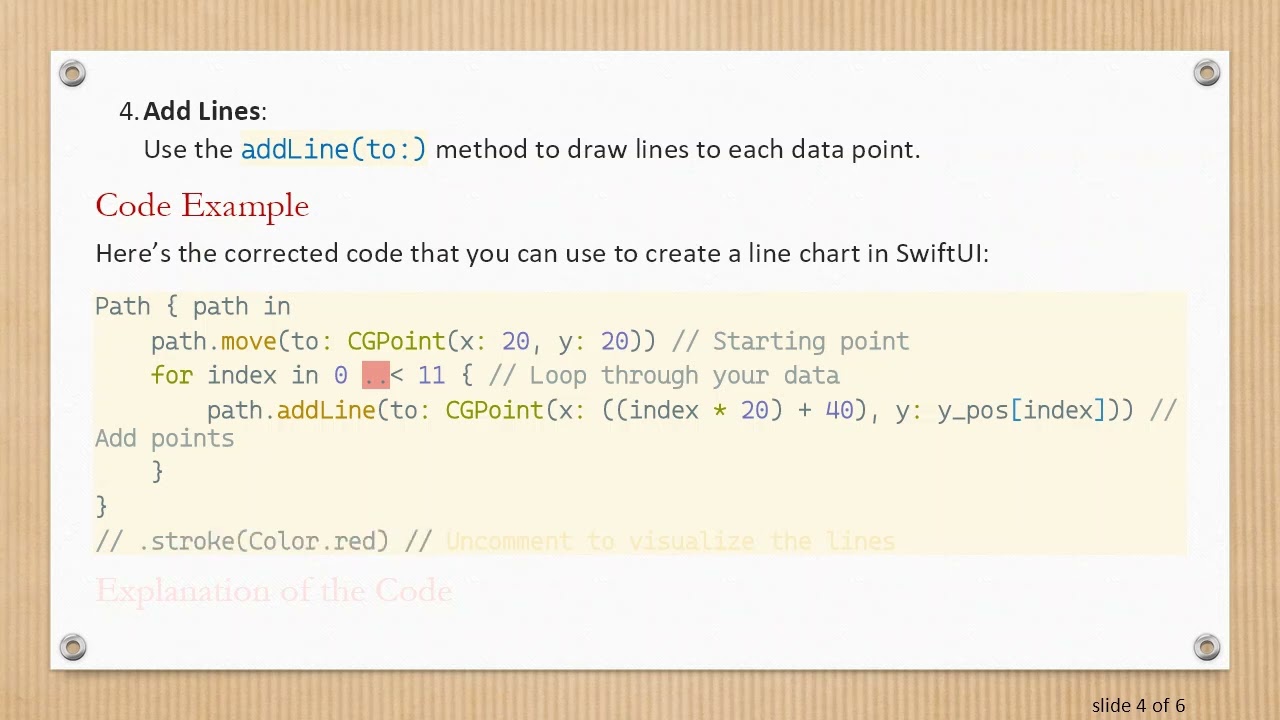
Add Lines:
Use the addLine(to:) method to draw lines to each data point.
Code Example
Here’s the corrected code that you can use to create a line chart in SwiftUI:
[[See Video to Reveal this Text or Code Snippet]]
Explanation of the Code
Path: This creates the context in which you'll draw your line chart.
path.move(to:): This function sets the initial coordinates (20, 20) for the chart.
for index in 0 ..< 11: This is the loop that iterates through your data. Here, 0 ..< 11 would give you indices from 0 to 10.
path.addLine(to:): This method connects points on the chart based on your data array y_pos, which should contain the y-values for each index (e.g., y_pos[index]).
Final Touches
To visualize the lines that have been drawn, you can uncomment the .stroke(Color.red) line. It adds color to your line chart and makes it more presentable.
Conclusion
Now that you've learned how to draw a line chart using SwiftUI, you can further customize it by modifying colors, line thickness, or even adding labels. Remember, the key takeaway here is to use a for loop in your Path definition for drawing lines, rather than ForEach. Happy coding, and enjoy bringing your data to life with beautiful visualizations in SwiftUI!
Доступные форматы для скачивания:
Скачать видео mp4
-
Информация по загрузке:


![JavaScript - Полный Курс JavaScript Для Начинающих [11 ЧАСОВ]](https://image.4k-video.ru/id-video/CxgOKJh4zWE)


