How to make a Curved Glulam Beam for a Shepherd Hut roof: Complete Step-by-Step Woodworking Guide
Автор: Ty Green Ltd.
Загружено: 2024-09-14
Просмотров: 81631
In this video, I’ll guide you through the process of creating a beautifully curved beam using thin layers of wood. From cutting the layers to forming and gluing them together, I'll walk you through each step to help you master this woodworking technique. Whether you’re an experienced carpenter or just starting out, this method is both accessible and effective. Here’s how it’s done:
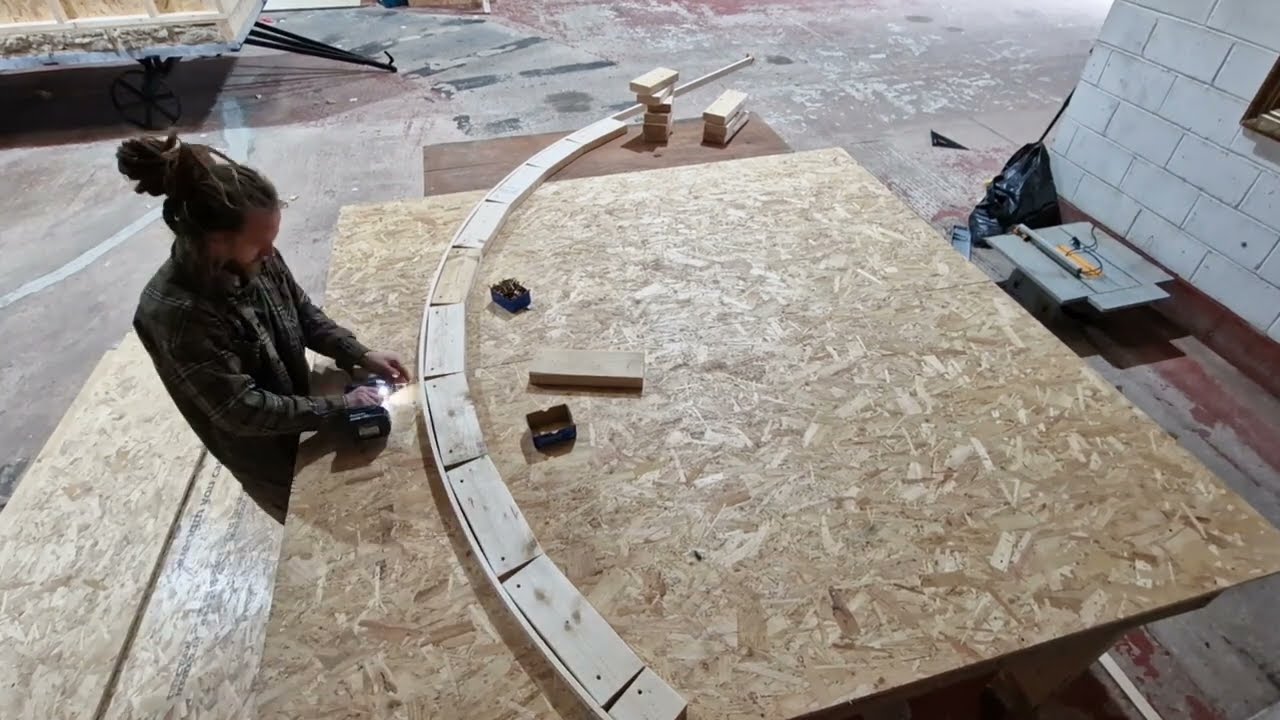
Step 1: Cut the Thin Layers of Wood
I start by cutting the thin layers of wood using a table saw, setting the thickness to 8mm. It's crucial that these pieces are thin enough to bend without cracking but thick enough to maintain strength once they're glued together.
Step 2: Mark Out the Radius of the Curve
Next, I mark out the precise radius of the curve on a work surface. This becomes the template for the beam's shape, ensuring consistency and accuracy as we form the curve.
Step 3: Create the Form of the Curve to Clamp To
With the radius marked, I create the formwork that the beam will be clamped around. This involves setting up pieces of wood along the curve to act as a guide and support during the bending and gluing process.
Step 4: Fix a Front Piece to the Formwork to Create a Smooth Face
To achieve a smooth, uniform curve, a front piece is fixed to the formwork. This provides a surface against which the wood layers are bent, ensuring a clean and consistent curve along the entire length of the beam.
Step 5: Apply Glue to Both Faces of the Layers
I use Gorilla Wood Glue for its strong bonding properties. Glue is applied to both faces of each layer to ensure a solid and durable bond. It's important to spread the glue evenly to avoid weak spots in the final beam.
Step 6: Clamp, Glue, and Screw the Thin Pieces Around the Formwork
The layers are then carefully clamped, glued, and screwed around the formwork. I use long screws to go through all the layers while clamping. This technique helps hold the shape more effectively and reduces the need for excessive clamping, ensuring the curve stays in place as the glue sets.
Step 7: Plane Down Both Sides to Tidy
After the glue has fully dried and the beam has taken shape, it's time to remove it from the formwork. The final step involves planing down both sides to smooth out any rough edges and give the beam a clean, professional finish.
Creating a curved beam using this method can be applied to various projects, offering both strength and aesthetic appeal. Watch the full video to see the process in action and pick up some useful tips along the way!
#CurvedBeam #GlulamBeam #Woodworking #CarpentrySkills #DIYWoodwork #Woodcraft #TimberConstruction #Handcrafted #CustomWoodwork #TimelapseBuild #WoodworkingTips #Joinery #CarpentryProjects #WoodworkingCommunity #HowToBuild #WorkshopLife #WoodworkingTechniques #BuildingProcess #CarpentryTutorial #TimberDesign #DIYBuild #Craftsmanship #Construction #ShepherdHut #WoodworkingProjects #YouTubeShorts #Shorts #WoodworkingIdeas #DIYWoodworking #SustainableBuilding #GlueLamination #Glulam #WorkshopCraft #BespokeDesign #DIYProjects #Woodworker #HomeImprovement #TimberFraming #ToolsAndTechniques #MakerMovement #BuildItYourself #CurvedWood #LaminatedBeam #WoodworkingSkills #WoodworkerLife #WoodworkingPlans #FineWoodworking #BuildWithWood #Woodshop #WoodworkCraft #CreativeCarpentry #CraftsmanshipMatters #CarpentryLife #ToolTips #DIYFurniture #WoodLovers #BuildAndCreate #CarpentryTechniques #TraditionalCraftsmanship #LearnWoodworking #CraftingWithWood #TimberWorks #DIYCarpentry #Woodgrain #WoodworkingPassion #ArtOfWoodworking #HowItsMade #WoodworkVideo #LearnToBuild #DIYCraftsmanship #WoodworkingJourney #SustainableCraftsmanship #shepherdhut
Доступные форматы для скачивания:
Скачать видео mp4
-
Информация по загрузке: