realme C2 Disassembly | realme C2 Teardown | How to Open realme C2 all Internal Parts | Fix By Mamun
Автор: Fix By Mamun
Загружено: 2024-10-18
Просмотров: 198
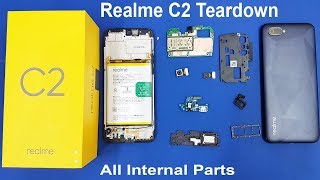
Disassembling a realme C3 requires careful steps, as it involves delicate parts. Below is a guide to help you through the process. Proceed at your own risk, as disassembling may void warranties or damage the device.
Tools Required
Plastic pry tools
Phillips screwdriver
SIM ejector tool
Tweezers
Suction cup (optional)
Heat gun or hairdryer (optional, for loosening adhesive)
Disassembly Steps
Power Off the Phone
Turn off the phone and remove the SIM tray using a SIM ejector tool.
Remove the Back Cover
Use a plastic pry tool to carefully detach the back cover.
Start from a corner or along the seam, then slide the tool around the edges.
If the back cover is tight, gently heat the edges using a hairdryer to soften the adhesive.
Disconnect the Battery Connector
Unscrew the plastic cover over the motherboard (usually a Phillips screwdriver is required).
Carefully unplug the battery connector using a plastic tool to avoid short circuits.
Detach the Battery
Use the plastic tab (if present) to pull out the battery.
If the battery is glued in place, gently heat the back of the phone and use a plastic tool to lift the battery. Avoid puncturing the battery!
Remove the Motherboard and Cameras
Unscrew and remove the motherboard cover.
Disconnect the camera modules and any ribbon cables attached to the motherboard.
Carefully lift the motherboard out of the frame.
Remove the Charging Port Board (Bottom Section)
Unscrew and remove the bottom plastic cover.
Disconnect any ribbon cables leading from the charging port to the motherboard.
Gently lift the charging port board from the frame.
Access Other Components (Speakers, Buttons, etc.)
Use tweezers to detach any small connectors for buttons or speakers.
Remove or replace individual components as needed.
Reassemble the Device
Reverse the steps carefully, ensuring all ribbon cables and connectors are reattached properly.
Ensure the battery connector is secure before replacing the back cover.
Replace the screws and covers for the motherboard and bottom section.
Reattach the back cover, ensuring it snaps securely into place.
Notes
Be cautious when handling the motherboard, camera modules, and battery.
Keep screws organized to avoid confusion during reassembly.
If you encounter strong adhesive, don't force components; apply gentle heat.
This process is technical and requires some experience, so if you're not comfortable, it may be best to consult a professional technician
realme C65 Green Line Display Fix | Teardown Video | Fix By Mamun
• realme C65 Green Line Display Fix | Teardo...
Check Mobile Activation Date | realme and OPPO & Spare Price List | Fix By Mamun
• Check Mobile Activation Date | realme and ...
realme C61 Liquid Damage | Broken Display Replacement | Fix By Mamun
• realme C61 Liquid Damage | Broken Display ...
realme Note 60 Reviews আরও বেশি শক্তিশালী মোবাইল IP64 | Fix By Mamun
• realme Note 60 Reviews আরও বেশি শক্তিশালী ...
realme Fixing The ridmik Keyboard Not Showing On Lock Screen realme C67 Phone | Fix By Mamun
• realme Fixing The ridmik Keyboard Not Show...
realme C25-Y Automatic Switch Off Problem Solved | Fix By Mamun
• realme C25-Y Automatic Switch Off Problem ...
realme Note 50 - Unboxing First Impression iPhone Look | Fix By Mamun
• realme Note 50 - Unboxing First Impression...
Install Screen Protector on Your realme Smartphone Without Bubbles
• Install Screen Protector on Your realme Sm...
realme Note 50 - Green Light Line On Phone Screen Replace Display Within 7 Min
• realme Note 50 - Green Light Line On Phone...
realme C11- Full Disassembly & Assembly Video | Teardown Full Video | Fix By Mamun
• realme C11- Full Disassembly & Assembly Vi...
realme C61 Strength & Durability in Every Build- realme C61 Stand Strong
• realme C61 Strength & Durability in Every ...

Доступные форматы для скачивания:
Скачать видео mp4
-
Информация по загрузке: