How to Bulk Import Users into Genesys Cloud
Автор: Genesys Cloud with Logan
Загружено: 2023-11-22
Просмотров: 474
!!CHECK TO HIT THE SUBSCRIBE BUTTON!!
Yes, Genesys Cloud supports Bulk User Import using a CSV file directly through the Admin interface. This is the recommended way to add or update large numbers of users, their roles, queues, and skills simultaneously.
The process has two main phases: File Preparation and Platform Import.
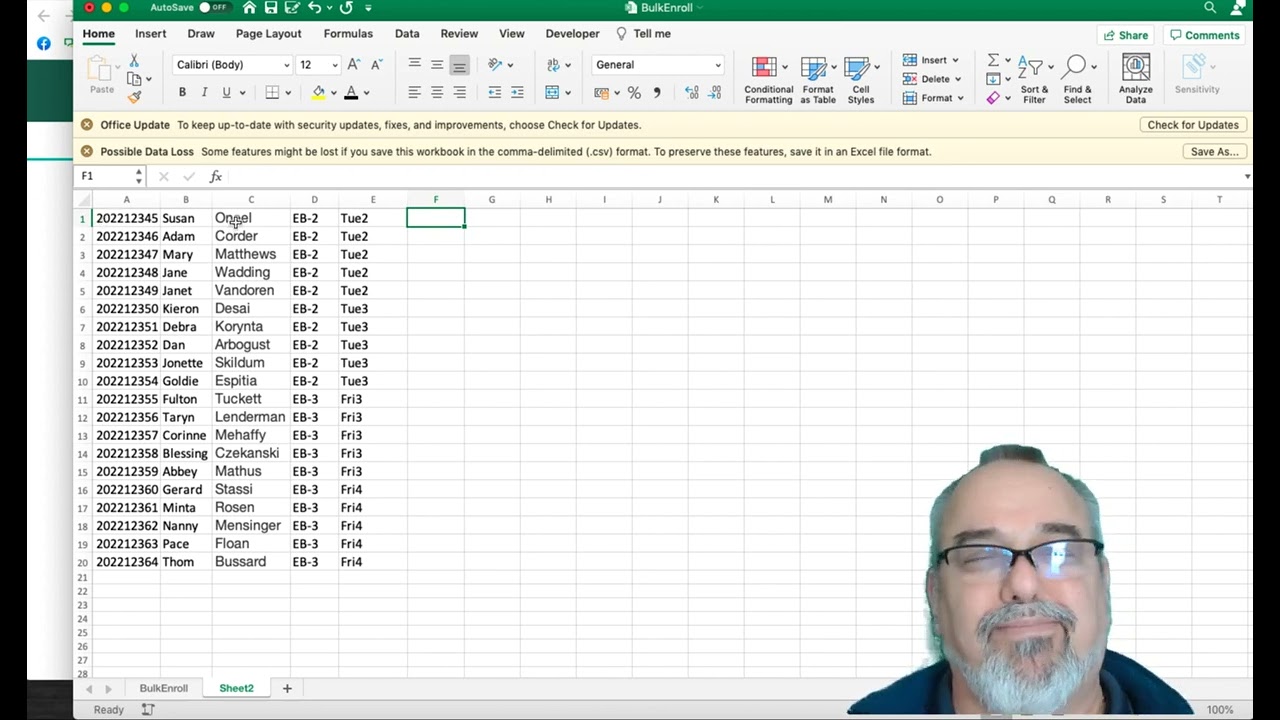
1. CSV File Preparation
The accuracy and format of your CSV file are critical for a successful import. Genesys Cloud recommends creating the CSV file by exporting it from a spreadsheet application (like Excel) to ensure correct formatting (quotes and commas). The file must be saved in Unicode or UTF-8 format.
Required & Common Fields
The data must be in a specific order in the CSV file. The minimum required fields are:
Field Name Mandatory? Purpose
name Yes The user's full display name.
email Yes The user's unique email address (used for login and invitation).
phone_work No The user's direct work phone number (E.164 format).
extension No The user's internal extension number.
roles_divisions No Specifies the roles and divisions assigned to the user.
queues No Specifies the ACD queues the user is a member of.
skills No Specifies the ACD skills and proficiency levels.
Formatting Complex Fields
• Queues: Separate multiple queue names with a comma (e.g., SalesQueue, SupportQueue). Queue names themselves cannot contain commas.6
• Skills with Proficiency: List the skill name followed by a colon and the proficiency level (1-5, 1 being lowest, 5 being highest).7 Separate multiple skills with a comma (e.g., English:5,Spanish:3).8
________________________________________
2. Steps to Bulk Import
Once your CSV file is prepared and formatted correctly, you can perform the import via the Genesys Cloud Admin menu.9
1. Navigate to Admin: Click the Admin icon.
2. Go to Users: Under User Management, select Users.
3. Start Import: Click the Bulk Import button.
4. Upload File: Click Browse and select your prepared CSV file.10
5. Send Invites: Optionally, select the Send invite automatically checkbox to prompt new users to set up their password and profile immediately.11
6. Review: Use the Import Preview feature to review the data and check for errors.12
7. Start: Click Start Import.
Import Process Sequence
The import runs through multiple stages, and a status bar will indicate progress:13
1. Creating People
2. Associating Managers14
3. Creating & Assigning Locations15
4. Assigning Roles16
5. Assigning Queues17
6. Finished
Important Limitations & Notes
• Update Behavior: When updating existing users, the import process adds roles and queues; it does not replace or remove existing roles, queues, or skills.18 Manual cleanup may be required if you need to remove old assignments.
• Password: Passwords are not included in the CSV file. New users are automatically prompted to reset their password upon their first login.19
The documentation on Genesys Cloud Bulk Import is very detailed, and you can find a thorough video walkthrough on this process. Bulk Import Users in Genesys Cloud provides an overview of how bulk import features work, which is relevant to understanding the scope of what can be automated.
Please feel free to send queries (OR) ask for in person training FOR FULL COURSE WITH HANDS-ON EXPERIENCE when you are interested.!
Contact through My email:LOGAN.SUPPARAYAN@GMAIL.COM

Доступные форматы для скачивания:
Скачать видео mp4
-
Информация по загрузке: